Continuing on from the previous Game Jam (Plant Trap) our tutor decided to organise another game jam to once again give people the opportunity to gain extra credit. With this Game Jam my team was Me, Phil, Mark and Shane. The topic for this game jam was an application (mobile game) and we have to have 1 main character, 1 main mechanic and 1 environment. We could do this however we liked to build any game we wanted along as it tailored to these categories. To begin the design process as always we planned our what makes a good game. We went down the route of mobile games being addictive, fun to play and easy to pick up. Due to this we collectively thought of examples of games on our phones:
Flappy Bird
Bloons: Tower Defense
Paper Toss
Angry Birds
These are just a couple of examples, from this we determined that animals in games birds and monkeys etc. So from that we tried to list as many animals as we could that potentially had or hadn’t been done. From this we narrowed it down to a Mole, obviously games like Whack-a-mole are in existence but we could do our own game with a mole character. From this somehow we decided it would be fun to make him a funky disco mole with huge sunglasses and an Afro who has friendly disco moles and rival gang moles trying to sabotage his funky life. Alongside other moles trying to sabotage his mole hill we looked into common predators for moles, this came back with snakes so another enemy designed was a snake. Then to gain a life we had what moles like to eat which is worms once you collected enough worms you gained a life. My personal involvement in this project was in 3D and HUD, I designed the main character also known as “Molevin” it was a really simple design but could be edited and re-textured to create other characters. Which is what I turned Molevin into the enemy character who had different attire wearing a vest and a top hat with a flower in, then for a boss I scaled it up added a bandanna, match in his mouth and a bomb in hand with gloves on. Simply by reusing and editing the initial main character I created 3 characters for in game use good, bad and boss. I also created a tree stump that i projection painted using a mudbox preset to be used for the environment which wasn’t implemented in the end due to it being a unnecessary obstacle on a small environment game but it was used in the Game Over screen to add a visual. The environment is a field and the mole sits in the middle in what was supposed to be a mole hill but its more of a ditch at the moment. It has randomly place assets of grass and stones in the level just to add to the visuals.
This is my work for the HUD designs, using Photoshop to create simple circle icons, i took images of the characters to link it directly to the game, good guy is people saved, worms are lives, and the enemies are how many you have killed throughout the game. Very simple icons but still useful for covering the HUD elements in the game and also with it being a mobile game we didn’t want too much going on to get in the way of the game so small simple icons were effective in avoiding too much distraction from the game.
Here is the in game screenshots of the working HUD and game with my characters in. The menu system, game over and leaderboard design was made by Mark using the custom typeface we created by using a paint brush to go the font on paper then scan them in to be textured on the signposts. Mark used assets from all team members to piece together the menus, start featured everything, game over features the bad guys to symbolise they won and you lost, then the leaderboard was just visual models like grass, rocks and tree stumps. This game I had quite a prominent role in the modelling due to my increased skills over the year and primarily being the more advanced modeler in my group. As for HUD designs I was pleased with my products as they was simplistic but worked well with the theme of the product. As for the game to evaluate it we was very pleased with the end product it was fun and addictive players had to click (or tap for mobile which didn’t work) the enemies to kill them (1 for standard enemy and 2 for the snake). This racked up your score for kills and the aim was to last as long as possible as move and move waves of good and bad characters came into the level at varied speeds and difficulty as it progressed. Only disappointment I had was that my boss character never got time to be implemented but like the other game jams if we had time to progress we would implement a boss level for example. This was my personal favourite of all the game jams as i liked the style of game we had created. I’m looking forward to next next game jam which is in Cambridge Jun 2015.
Here is the video footage of game play from Mark Shaw’s YouTube channel:
On the return of Easter as group leaders we was hoping to see our teams work over the holidays towards the project. Unfortunately when asked the majority of the group had focused on their self initiated projects instead of the client, this was quite disappointing as everyone was set targets and agreed to them before Easter. Nevertheless we proceeded with the group meeting after I stated to the group that we all agreed on a target and seen as myself and Phil was pulled from the project due to doing too much work on it and not enough on the rest of our work it was down to the rest to produce work.
With that all being said we had estimated we have around 6 weeks left due to no pinned down hand in dates, due to this we all agreed that to have a 2 week clean up period before the final hand in was a sensible action to take. This would mean we have 4 weeks to finish everything outstanding for every individual in the group, then those 2 weeks would be spent checking all the work for errors, bug testing the engine, and then correcting any errors that existed. This would be a similar procedure than what would be taken in industry, before a game would be shipped everything would be checked, checked again and checked again really. The final product is the key and will be on view to the public for example we don’t want to be explaining why that car is floating above a building its unprofessional and with this 2 week clean up period this should eradicate any issues.
Before Easter in the last session we had been trying to come up with a name for the project (see link for design process of name), with many being generated and one not particularly pinned down we decided to leave it until after Easter to decide on a name, this allowed anyone to have a think and possibly come up with a name for the project. With that being said we finally decided on my idea of “Old Town Memories”. I particularly liked the name because it had a soft ring to it, also it directly linked to our project with us designing a section of Old Town and with it being the 1960’s and most people will still be around from that time period remembering what it was like it would spark memories.
With the named being decided on the design documents for the public eye needed to be done. This would include things such as leaflets/flyers, concept booklet, logo/banner, and a bio of the project. This would be a general input from the entire group as the more input the better. My personal input was that we need a theme to it, a general style for each document which replicates over the other documents gives a professional look to it all. As for style i suggested as I did to David with the UI/HUD elements to research into fashion colour trends on the time period to try link it all in.
Closing the group meeting I emphasised the importance of communication, we need to talk people cannot be at any point in the dark now, if there are any struggles from any individual they need to be open about it so somebody can help to progress them further or take the work from them so its completed. Its crunch time and teamwork needs to be a priority.
Moving on, in-between session 20 and 21 we had a surprise meeting with our actual client John Netherwood the chairman of the Hull Civic Society. The required myself and Phil to take the meeting and introduce ourselves, our work and what we have done with the project. To have a quick and efficient way of showing the project instead of having them playing it, Phil made a matinee sequence which made a fly around of the project disabling all player controller input. Mr Netherwood arrived with his wife to see the project, myself and Phil proceeded to shake hands and take the meeting in a professional manner. We discussed current progress, features and our passion towards showing this to the public. Which we was confirmed with a venue of the History centre alongside the fashion students 1960’s project. Also a near certain of Hull’s transport museum in September when the Hull Heritage week is on. Then any other possible venues we would need to seek out ourselves which we had planned to do in the next session. We are also going to try contact the Hull Daily Mail to do a article on our work at its current stage and then a follow up of where it will be by the time the Heritage week comes around.
Overall myself and Phil was very pleased with how the meeting went, we stayed professional and happily had a back and forward conversations from questions posed from the client. Discussed what they would like to see from the project and so on, it was a really beneficial meeting for myself it allowed myself to gain confidence in talking to potential clients as we was naturally nervous about what they would think. They also liked the name of the project which was pleasing as we had trouble pinning one down initially so all positives came out of the meeting which was great for us.
Moving onto session 21 which will continue into Thursday as we presented all of our work since Easter on Thursday including the client work. Initially in the session we had a brief catch up on what work has been done since last week, this week we had a full group which we didn’t the previous week so everyone was caught up. After that Myself, Phil and our tutor Paul went to go try secure some potential venues for showcasing our work. This would test once again myself and Phil on our professionalism and communication skills. We initially talked to the Transport Museum in which we had to fill out a form to send to the governing board to approve. Moving on it was now open to us to try secure venues, we managed to get Fanthorpes on silver street and prospect centre as definates, then kapow, princes quay, st stephens, ferens art gallery as possibilities. Unfortunately a few no’s came with asking from shops like granger games and thats entertainment but we still tried, rejection is all part of it you dont get if you dont ask.
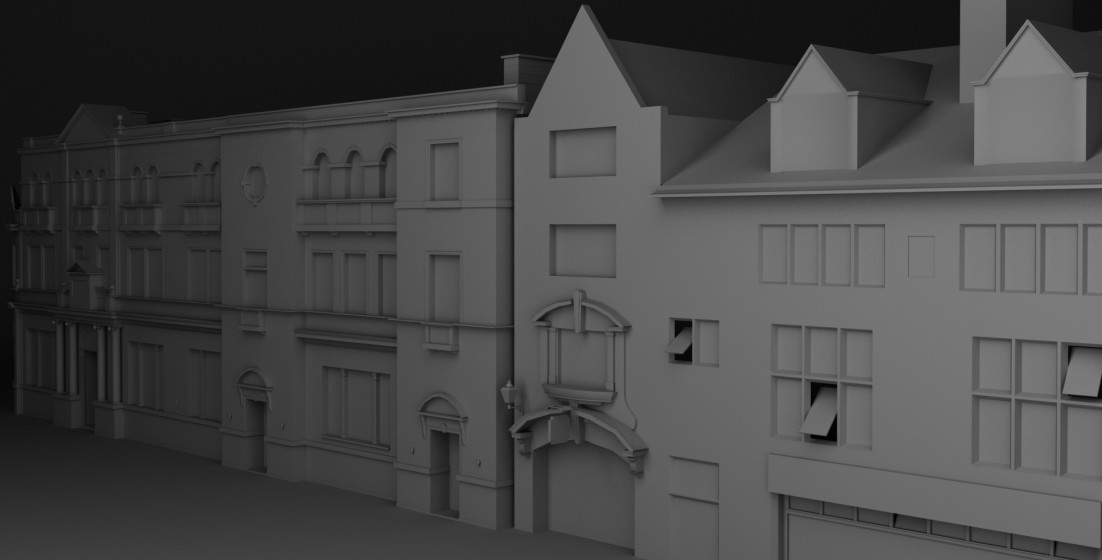
Then on Thursday we showcased our work for the client. My work involved completion of buildings on Trinity House Lane which were Wetherspoons, trinity market entrance, bob carvers, and Davids handed over building which is currently a coffee shop called Coco’s. I will now go through my building to their current stage from what I did in my presentation in a briefer form with a self evaluation for each.
This slideshow requires JavaScript.
These photos were taken by James Branson (his blog) when we all went out taking photographs in the early stages of the project.
This is my model of the current Wetherspoons (we are unsure on the original building so may take artistic license to leave it as a pub until we find more). This building has taken me around 3 weeks with working on other things at the same time, as its a highly detailed building I think this is an acceptable time. I have put this down as finished ready to be handed over to the texture team and then to go in engine, the model itself could do with some time taken on optimisation but due to the upcoming deadline my time is better placed elsewhere as the optimisation wont effect us hardly at all and if needs be the texture team can go in to the model and delete loops or polygons to support the unwrapping. The building itself is 21,888 poly’s which with the fine details and complexity of certain features in the building I feel it is a realistic poly count. Issues I came across whilst modelling this was correctly scaling the sections of the building as it seems to be sectioned by ledges, putting the ledge in the right place so that all the window frames, pillars and so on was also to scale was key to the building looking correct. This took tweaking but im pleased with the end product and proportions of the build. The development in my modularity has aided me well in this particular building as extruding pieces like the window-frames, pillars, chimneys, lights etc was the same and only minor edits to the curvature on some parts was needed allowing quick development when adding a feature such as a window-frame. Overall being a later building in the year I feel my 3D skillset had progressed massively in comparison to initial buildings in terms of quality and speed, if any problems arise im confident enough now to quickly amend any issues.
These photos were taken by James Branson (his blog) when we all went out taking photographs in the early stages of the project.
This building is the entrance to trinity market, a fairly simple building that didn’t take me very long, as soon as Wetherspoons was complete the building speed increased rapidly. This building I have had to make sure it matches correctly with wetherspoons, i found the modelling of a section of a street so building sections together was far more effective as scale and alignment was much easier to achieve than when your working alongside another person and having to make changes once you realise in engine its slightly out. The building itself I found fairly easy as once again its a later building in my year and I feel more advanced in my 3D work. the only issues was to how to make the extruding shape around the first window in the lowest possible form, which i realise would be as a separate pushed in object to the shape rather than modeled in around the window. Generally the building was simple just swift loops for the windows of the building and door, then everything else modeled separately and snapped to the building facure. Another building im pleased with, finished and ready to hand over to texture and then go into engine. Only addition would be needed if texture team agreed would be the slight fence style look above the door which I thought could be done with a plane that they can make a alpha map to create the fence then a normal to make it pop. Thats only addition needed to this building I believe.
These photos were taken by James Branson (his blog) when we all went out taking photographs in the early stages of the project.
This building is currently Bob Carvers on Trinity House Lane. With this model once again the 3D capabilities are there too do buildings like this with good speed and quality at a good optimised level of poly’s. Not many problems came up, due to this i decided on certain windows when we walk past are sometimes open, all i had to do was select the window poly’s detach them from the building then rotated them slightly to give the impression that the windows are open. The group gave me great feedback on this saying they loved the idea and it makes the building looked alot more used and lived in even just with the simple open window rather than a plain shop facure. Again it was just getting the proportions of the building right in relation to my other models and using gathered photography this was made alot easier. I think of all my buildings I like this the most purely because of the windows, it just makes everything look more real and alive. Obviously I will need to make a simple box to simulate a interior as the windows are open and if a player angles it right they will currently be able to see the sky so a simple box interior will solve that problem.
These photos were taken by James Branson (his blog) when we all went out taking photographs in the early stages of the project.
This building is currently a coffee shop called Coco’s, this was originally another students building (David) but he handed it over to me for optimisation and the addition of an interior. I had decreased the poly count from just over 1000 to 238 and that was with adding an interior with shop window showcase area. Being a very simple building I dont really have much to give feedback on, its a basic building which took no more than 30 minutes to optimise then add the interior section using simple edge modelling workflow to then bridge the gaps. I did notice one issue, nothing major but pointed out in the presentation id overlooked the way it had been done at the front with the windows, and this results in N-gons in the gaps either side and between the windows. Simple fix with connect or cut tool. All of these buildings are now ready to be handed over to the texture team.
Here is a few pictures of the complete street section on Trinity House Lane:
I found that modelling a street section was far more productive and beneficial for myself as a 3D modeler. This was because mainly the dimensions, scale and proportions of buildings, I could use the other buildings i had completed and finished to adjust the new ones to make sure the street looked correct. This worked both ways as any misjudged dimensions could be effectively grabbed and moved into place.
Then for Silver Street I have finished RBS and started the silver street entrance to trinity market.
This is currently RBS bank building on Silver Street. Once again a very basic building wasn’t much to it just a few insets for windows after I had added loops to extrude some ledges. Because of the simplicity of the building I added a small shop window interior so that there is potential to turn it into a shop if we find out the original status of the building and if we don’t then an artistic decision will be made to adapt the building to possible a bakery for example.
And finally from the buildings i presented was the beginning of the silver street entrance to trinity market. This is a fairly complex but also modular building for frames and decorations, then a symmetry modifier applied will allow me to easily check the finished building as its only sensible for speed to model half the building if its complex when symmetry can do the work for you on the other side. This building is currently stalled, this is due to the final hand ins coming to a close we have decided for hand in and the public we have to focus on the texturing of Whitefriargate and Parliament Street, all other buildings will be put in with the basic grey block in the background to suggest that the area is under construction and will be completed for main showcase in September.
After we had presented I took the role off Abbiella to create a professional email so that we could email the clients that we had and hadn’t discussed potential showcasing for the project with. This required me to type 2 emails, both similar but adjusted for seen and unseen clients. Once typed it up I asked my tutor Gareth to have a proof check to see if anything could be improved or any key information had been missed. The final email also had a link to our latest video fly through of the project so that the clients could have a quick taster to what we had been working on and will be showcasing.
This is also the grey block video fly through we showed our client John Netherwood when he came in. I disclosed that this is not the final product but an in progress project we gain alot of benefits from public showcasing for our marks and the projects quality. This final email was sent to Fanthorpes, St Stephens, Prospect Centre and Princes Quay.
After waiting a few days I had successful replies from St Stephens and Fanthorpes confirming interest in allowing us showcasing our work. Fanthorpes was already secured from speaking to the shop manager originally but St Stephens was a fresh attempt of securing a client by myself. Since then myself and St Stephens have been in contact discussing the project and when we would like to showcase it. Coinciding with there times and available for displaying space, I managed to get us a showcasing date before our hand in (19th May) which is Friday 15th May. This required us to have a Public liability insurance cover which initially i didn’t know if we have but with contacting my tutors we do have a copy to send to St Stephens and prepare for Friday. Our location is just outside the elevator near the bagel food vendor stall, next week I will discuss with the group on shifts for the showcase as I personally would like people to man the project in-case any of the public wish to stop and talk to us about what we are doing.
A slight issue with St Stephens arose with my tutor Gareth with that it is the shopping centre/ area that has crushed the Whitefriargate area for business and popularity. So when we showcase there as long as we are displaying it as a student project following on from the previous years of the heritage project and our area is a section of Old Town including Whitefriargate, it can be clearly seen as a project rebuilding an area of Hull in the 1960’s and not a display to support Whitefriargate. This turned a few of the group off as they don’t really want any hassle from the public but at the end of the day its an opportunity to showcase our work that i have secured before hand in so participating in it will add to our professionalism and “getting our work out there” for feedback/review.
Will this just around the corner next weeks focus as that is also the session all the texture team should have the Whitefriargate and Parliament Street area textured, so the focus will be on promotional materials for our project. Any promotional materials we have can be a extra visual for the project for the public to have, which will aid them in understanding the project and what we do to make it what it is.
In the Year 1’s session today they was set the same task we had last year, to model assets with a restricted polycount to make them aware of polycount limits in games also known as a budget.
They proceeded to model the items they had drawn by card and by the end of the session handed in what they had got. Paul then proposed for the guitar controller to be done by next week in 128 polys to everyones disbelief and shock, operant conditioning was applied to this of a reward of a sausage roll if someone could complete it in half of that so 64 poly’s…challenge accepted. Realising i did the guitar last year i did it in 188 polys, now i thought it would be beneficial to myself to try model it again as fast as i could in as low poly as possible.
In around 5 minutes i had a 88 poly guitar, loosing some loops and strategically placing certain edges to create a similar shape without the loop i managed to get it down to 68. Not much could be seen to do, then i realised i still had my reference image underneath my model for shape…this cut it down to 48. So i had won id done it, but i didnt stop there i wanted to optimise it to the lowest possible it could be still looking like a guitar.
Fully optimised I managed to get it to 39 poly’s by this time a had the majority of first year surrounding me.
So in around 15minutes i had a 39 poly guitar, which was modelled in 5minutes then it just took some thinking to how i could keep the shape but lower the polycount. In comparison to last years 188 which admittedly i loaded up and it was horrific topology I can clearly see how much i have come on since this time last year. The 1st years now dislike me as I have proved it can be done and in very little time giving them no excuses…sorry guys!
With us really wanting to push for the christmas period myself and fellow leader Phil had skyped the night before to dicuss what was to be done for Tuesdays session. Last week we had gathered few had done the texturing of the buildings deadline we set so we decided to pin down the interactivity side of things. With that out the way we both agreed that we should start off with another group critique as they are very beneficial for everyones work to improve, then move onto pushing on with the assets everyone was given to try get the level more detail in the block out. This would have happened if more than 4 people turned up. Due to this us 4 Myself, Phil, David and James decided that we would set ourselves a mini brief for the day with a deadline of the end of the day to see how far we got on with it.
This was:
1) To generate an asset list for the concept art street block offs
2) Allocate those assets
3) Get as far along as possible with each asset to be given feedback on by the end of the day
With this being done we quickly used the previous asset list to narrow down what our block off would be, we chose the furniture van conept idea where people had parked a furniture van and was unloading items therefore in the way of the player to get past. This required a furniture van, sofa, chairs, table, cuboard , filing cabinet and people. I took the van seen as i am the strongest vehicle modeller of the group and are focusing on it in my self initiated.
Transport museum reference
Other blueprints
Top blueprint
Side blueprint
Here are the images i have gathered to help me with the modelling of the van. The blueprints obviously aid with the scale and proportional side of modelling, then the added reference from hulls transport museum is a nice feature as we know the van exists in the area as a furniture van (its initially where we got the idea from).
This slideshow requires JavaScript.
This is what i managed to come up with, I had done up to the basic shape low poly with added interior midway through the day then just applied a turbosmooth to create the cars natural shape. Everything apart from the steering wheel and the front grill had been completed by the end of that day, but i did finish them on the wednesday. I was pleased with my end product after being unsure and unable to find the scale i had to use vectors from a modern day transit van for height and length to get what felt natural for this van. With this being a day and a halfs work I was impressed with my speed clearly showing myself im improving in my modelling skillset to produce a decent end product in what is a short amount of time for a vehicle. There are some parts with smoothing issues around the windows but they are not too bad and look presentable in engine. I chose to open the doors as then some of the assets the other guys had designed could be placed inside for realism, but if needs be i can simply close the doors to give variation if the van is used multiple times in engine.
All it needs now is a texture im yet to start this as i had to go back to buildings but it will be done over christmas. Hopefully next week we can get a group critique in before christmas which will be the 2weeks off, but its not really off as we are behind on the project from where we should be and need to be working over the holidays before hand in.
Following on from last session which was a group critique session we had set the task of texturing at least 2 of your buildings (if time permitted dependent on building size) i chose to texture 3 of my current 5 buildings leaving marks and spencers due to size and poundworld as it would be used for a group tutorial in session 10.
Texturing isnt my favourite part of the process but its one you cannot neglect or simply fly by as every artist should know a good model is nothing without a good texture as the texture bring it to life with colour or realism. There are multiple ways to texture as shown in my last year post on texture mapping which isnt all of the mapping techniques maybe just the most prominent ones. For now we are just doing simple diffuse maps for base colours, normal maps and ambient occlusion are to come after possible alpha maps if the building requires that.
During the texturing we decided to leave the windows untextured as a multi subbed objects so that we could find a reflective material in unreal engine 4 that resembles glass to apply to that area for realism, otherwise we would have to texture on a flat black window with a frame which loses some immersion in the game.
Here are my textures crawshaws and quicksilver turned out well but i had a slight issue on cheque centre which i will point out:
As you can see for the cheque centre (brick and blue building) i must have missed a step of stiching the seperate pieces of the pillars together to the building to create a seemless brick texture, the texture is tileable just its an error on my behalf of positioning. The brick itself is the right size and looks nice though so i have packed my uvs nicely to give the main part of the building higher resolution.
I was pleased how quick silver turned out (red and white building) wasnt a difficult texture really just the seperate colours to uvw unwrap in groups then pack together so i knew which to paint which colour, for the main bit of the building its not plain paint its like a plaster so i have textured it as a plaster.
Then crawshaws turned out just as well as quick silver, i had a slight issue where one uv had been packed into the wrong section so i had a random green part on the white section but simple rearrangement sorted that out. As you may have noticed before i did the texturing i have added a significant amount of detail to crawshaws now all its missing is the elegant flowers on the facure which will have to be sculpted and baked in a normal map later on in the process.
Then gameplay elements had been discussed around the group as for the january hand in we needed to tick the box of an interactive environment which meant gameplay features like pick ups. Phil has been working on this already with a key to open a gate and now we are working for a ladder system to get up on the side of the fire escape on the bank. Previously we already decided on a treasure hunt of some sort but the main theme behind it has now been discussed, i took notes and we came up with:
Staue hunt, find pieces to make the in game statue down a alley off whitefriargate.
important 60s items hunt- Anything relevent to the period that was seen as important.
Music Trail- I posed this idea for the player to find 60s music to hand to the buskers on the street for them to play. Collecting records or music sheets with notes on was the idea of pick ups behind this.
Fashion Trail- also myself could be different trails for different styles of the time.
Narrative- david suggested a story behind the hunt giving it a meaning, which i posed a tour guide to show off our buildings would be a nice feature especially for the public to watch rather than play.
History Hunt- similar to statue hunt, our tutor Gareth said this would appeal to him finding historical items around the place.
Event related hunt- Idea from myself and backed up by James, we are set in the world cup 1966 so we could have items in relation to that scattered around the are
Pick and mix- suggested a while back you grab sweets around the area from different stalls for the ultimate 6s pick ‘n’ mix
We thought that maybe a multiple choice of which to do giving you clues to just a certain trail dependent on the players choice would be more personal to the player and adds multiple replayability for different trails. Moving away from types of hunts we thought more mechanics:
Inventory system (collect items to fit in a car boot)- barrie posed this idea so the player could see what they have in game rather than a seperate window.
Pick up description- when you pick up an item it does a quick pop up of the item with a rotation around the asset and a brief description on what you have got.
Treasure map- idea i had of items are shown on the map so you navigate to where they are (maybe you need another previous pick up like phil did with the key to get to it) and then it dissapears off the map, then wolfy suggested the alternate where they show up when you have found them so a suspicious blank area could be your next item (guidance by clues)
Gareths idea- multiple hunt choice bu still have all asset in engine but only give guidnce and pick up abilities on the ones specific to that chosen hunt.
Then a badge reward in game achievement for a completed hunt giving the player a sense of a goal to work towards.
A final idea will be pinned down shortly i think we are going for the multiple hunts as it gives up a wider range of asset creation and a better style of gameplay for replayability. The treasure hunt is a really good idea as we can position pick ups in specific places so the the player really appreciates the environment around them.
Moving on the task set of 2 textured buildings by next week had only 3 people manage it properly some had done but had issues. Myself and Phil thought this might be the case as we identified a few previously to be sturggling on textures, so we did a texturing 101 session using my building poundworld. Phil mainly took the session with some input from myself when questions was posed by the group, then i went round and helped anyone who might have not quite got it. It was dissapointing to see not all the group participating in this helpful tutorial which is invaluable to the project and would have benefitted that individual nevertheless the rest of the group really appreciated the peer to peer learning given. Mainly i worked with James on the topics of Pelt mapping, light mapping, stitching and packing uvs for priority to resolution. I believe he now gets the hang of it but if not we will notice on hand in of his building to the engine so it can be resolved and re-addressed. We plan on doing another installment to the texturing 101 series when we move onto normal mapping and Ambient occulsion maps to make the buildings look really nice, showing people how to go about making them in 3dsmax and editing them in photoshop to produce better outcomes on your map.
After this was done i picked up another building which is on parliament street, i am well underway with that as we speak and will post results shortly.
In the meantime myself and Phil started on a modular road system for the project, which once textured will really start bringing the project to life with the buildings. This was tricky as angled roads and junctions splitting off the multiple roads require quite alot of tweaking and correct snapping but currently whitefriargate and parliament streets roads have been built to scale and snapped together. My contribution was whitefriargate and figuring out the snapping of the connection to parliament street using Phils modular road to get correct angles. This required many measurements we already had but then math to work out the distances from bottom whitefriargate to paliament street then the width on the angle of parliament street then to the crossroads junction at the end of whitefriargate.
Here is how i did it:
As you can see its all modular and snapped together, then the road to parliament street is angled on 9 degrees to match the direction of the road, all edge snapped and vertex snapped together. We will implement a slight curve in the actual road when the whole system is done to add realism as whitefriargate does rise up in the middle creating a curve.
We plan to do an update video on the project in engine shortly for a detailed visual fly through for everyone to see. Next week hopefully the modular road system will be finished. And everyone has been given 6 assets to do over christmas or before if speed is there with another building. So we are really trying to hammer down now to push the project on, the faster we can build it the more time we have to add and tweak features.
So just a quick recap, last session i tasked myself with a few more buildings to do which i did ahead of session 9 which would be our next installment of group critique. Everyone showed there buildings and was given constructive feedback and some progress was shown even with people who had been struggling so this was a bonus. Myself i showed my buildings 1 by 1 the quicksilver, pound world and cheque center, they received very positive feedback everything was to scale in proportion and for the detail i had managed the poly count was on the low side giving me much more room to add extra details in the future.
The group critique is to show our professionalism to give others constructive feedback being harsh or actually praise them for good work. This had some issues the week before with some not following the trend disrupting critique, but after a word from myself during the last session to be quiet i think the point had got across. The group was very professional towards all people who presented and gave some useful ideas. For example on Abbie’s building Kardomah her positioning of pillars and window frame was off as i rightly pointed out and others added to how could work out the right placement like putting a texture of the building front on onto a plane to get proportions perfect. Phil’s building I pointed out the window over hangs were not extruded for enough out and had multiple indents to them rather than flat which he said was working progress to build upon.
As a result to this group critique it had already been planned in advance to get 2 buildings textured by next week, Paul backed us up with this demanding it be done as the project should be alot further on. Myself i did 3 textures of my buildings and i left 2 for the next session which me and Phil have planned to take a tutorial lesson on texturing 101.
A rather brief blog post but being a group critique and it going well for myself with no improvements suggested it was just straight onto texturing buildings.
Moving on in our project from last time where everyone had been tasked for a building to do over reading week as a basic model, nothing fancy not the end product just a basic model to see if everyone was going the right way about doing everything and to give constructive critique to them if needed. As Group Critique is a requirement in a learning objective that we are marked on in the course we needed to take this seriously and act in a professional manner, as we would in industry. Personally I felt i did this and then followed up my critique when spotting flaws in some peoples models by showing them ways to fix it after they presented their work to the class. Not doing the work for them but showing them ways that they can call upon in the future to rectify certain issues. For example James had Ngons in his model due to not having loops where they should be and therefore having extra verticies in places, just a quick resolve using either the cut tool or the connect tool and target weld.
My buildings recieved good feedback from the group, Phil pointed out possibly the back part of Marks and Spencers was too far back in the model in relation to real life. I had noticed this but due to not having measurements of that particular area it was just a rough estimate. I will still address this issue and possibly ask Phil whilst i do this to agree on a placement, possibly throw it into unreal engine 4 in the block out to see if it has the right feel and look to it. Other thn that my building crawshaws was a basic model, the building having alot of elegant and elborate patterns or facures a basic model is alot to work on to the final product.
here are my buildings to the stage they are at now:
M&S-
This all looks like one model due to having a simple grey texture placed onto all the seperate pieces, but all i did was model the building in a half then sue the symmetry modifier to model the other half, after that i modelled every piece seperate the pillars the windows were just one simple asset that i have duplicated and snapped together in the case of the windows to create the illusion that its all one model when actually its just lots of seperate pieces attached together to make a model. Im very leased with the progress of this so far and the scale has been nailed to a the tee thanks to the meter wheel making modelling alot easier for me.
Crawshaws-
Then this is what is now crawshaws (still unconfirmed on what it was in the 60s as been unable to find any reference of it as of yet) looks alot more unfinished than m&s this is partially due to m&s taking longer but also because crawshaws has a very elegant facure with flowers and grapes etc on the building. so without them it is quite bland looking, i still need to model the top dome window part. And as you probably can tell due to not being on one side i havent needed to symmetry it yet otherwise it would be a step too soon. So thats where im at, i felt i could have been alot further along with this personally but this will be finished off soon no worries about that.
With all being said and everyone present showcasing there buildings for critique i decided to take notes throughout the session to pin down any common themes brought up and also what our next steps could be, so that if its an issue the ones who are not having these issues could do some one to one tutoirals with any people stuggling to show our abilities to work as a group and give peer to peer learning.
These were:
Texturing- General UV mapping, where to go next with the model, using different types of texture maps to improve the model, light maps, altas maps.
Lighting- The use of lighting to bring out a model really show it off, interior lighting/mapping.
Interior- generally everyone just designed the building from the outside, if we are going for realism surely the players will see through shop windows into the shops so a basic interior should be modelled with appropraite assets to fill it out and possible assets in relation to the football world cup theme we seem to be going with e.g. an idea i raised was flags on the windows and doors so that we wouldnt have to model the interior but that not be the case for every store as they will have a reputation, like a jewelers they will probably just have a simple pennant string with flags across a window its still showing support but its tasteful.
Little details- many of us have little details on the facure of our building like my building crawshaws has some flowers and grapes aside the windows, we have recommended basic low poly models of these in 3ds max and then to import them into mudbox or zbrush to produce a normal map which will give them realism without huge polycounts. Which sculpting and detail tutorials will be called upon and taught by us as not many have used sculpting software before.
Put into the engine- Most hadnt tested there buildings in the engine but we should be at the stage no matter how complete the buildings are to be enchancing our grey block out of the streets from basic bsp. so a collection next week of the building to go into the engine will be done regardless of building completion as at least we may identify scale issues or snapping issues etc.
Texture importance- some people had over modelled certain part of their building. for example things like window panes had been modelled in when that is a simple texture and gives generally the same appearance. Other things like pillars or window frames had been all modelled into one shape of the building, its much easier and less straining on the polycount to model pieces seperately and simply push them or snap them to the model.
Take into account buildings next to you- this will be a test of our group work, even if the building next to yours isnt you building you will have someone else next to yours and if its all going to work in the engine you need to make sure that they snap together otherwise we will have a street full or gaps or overlapping z fighting.
Topology- breifly raised before when i helped james, having ngons or loops where they should or shouldnt be can be of detriment to your model. Mainly in texturing it could cause skewing or stretching, its mainly fairly simple to fix topology but taking time to do it will be vital to the project.
Building specific collisions- we breifly dipped into engine ideas moving forward in the block out, what we mean by building specific collisions is most buildings have different shop fronts e.g. my building m&s has a fairly deep entrace to the shop front due to showcasing windows whereas what is now the card factory has a very flat shop front. So with that in mind building specific collisions will have to be made to give the game that extra realism and immersion, because if we did one simple block across both sides of the street the player would be confused why he/she couldnt at least go up to the door of certain buildings.
This concludes our group critique my personal reflection is that i was concerned slightly with the professionalism of some students during this as its such a vital part of our project, but the issue has been raised and hopefully next time this wont be a problem. Group critique will be a regular occurence in the project from now on so that any issues can be resolved quickly and effeciently.
We have had 2 students go on the radio over reading week promoting our project and asking the people of hull for any assistance they could give us if you wish to contact us here is where you can find us:
Over the summer i set myself a styled mini brief to try help myself improve my 3d modelling. I did this first by doing an rc car (see in my previous rc car process blog) but to step it up i wanted to model my own car. I own a 1996 classic mini equinox which is my pride and joy, what better to model that a car i can just go outside and see my mistakes in my 3d work. all my reference images are from my own car which i kept flicking to on facebook aswell.
This is how i got on i wont go into too much detail as it was a fairly extensive process, but i have captioned the process images to give you an idea what is going on and how i possibly did it.
This slideshow requires JavaScript.
So with putting all this together and finally tweaking everything to my liking, some pieces i added for personal preference. I was basically adding pieces to my car that i may do in the future. This could turn out beneficial when im unsure on buying something on my car i could model it add to it and see what it could look like.
Anyways to the final piece i was very pleased with. I came across lots of problems all of which i felt i tackled well, pinching, z fighting, smoothing issues, verts where they should be, overlapping, and getting the reference images in each viewport work when i change the view angle in my 3dsmax view. During this process i learnt massive amount about how i like to model and things i can use whilst modelling like new modifiers. One inparticular was FFD’s (Free form deformation) this allowed me to use control points to edit the shape of whatever i was shaping e.g. i did this for my bonnet to create a smooth curve on edges and surface. The modifier i used the most was definately Symmetry, this allows you to do half the work, all you do is model half apply symmetry modifier and make sure the mirror is central so that the vertexes in the middle can weld together or adjust the weld distance so it fits your reference viewports. Turbosmooth gave the model the high poly realistic aspect to the model, this varied in iterations dependent on what was nessacery e.g. the rims for the wheels needed 3 iterations due to the complex shapes of the spokes whereas the indicators only needed 1 iteration.
Here it is untextured, im currently looking into Mental Ray texturing and rendering in 3ds max to give myself a realistic looking textured car model.
This slideshow requires JavaScript.
So there it is..My high poly Classic Mini!
The polycount came to 879,277, a massive 563,715 of that beging the wheels which is huge in proportion to the rest. This will need to be baked down if i was to use it in a game realisticly, which would be a normal map applied to a low poly version of my mini to give it the appearance of a high poly model.
Update:
This slideshow requires JavaScript.
Started experimenting with 3ds Max in Mental Ray texturing using some preset and adjusting specular and gloss levels for certain things. Anything that looks white is Chrome in the actual render window but i need to set up lighting for this to show i will get to this. I rendered it at a couple of angles to see what it all looks like, this made me notice the glossiness and specular of the paint was far too high so it would need to be toned down. Also the glass effect i added to the lights didnt work as i needed to apply a interior texture for the lights it did work for the spotlights, and im yet to seperate the windows so they are just part of the car paint. All work in progress.
All in all im very pleased with the outcome, the model looks just like a mini its all to scale. I must give myself plaudits for pulled this off for sheer grit and determination to improve as there was times it wasnt going right and i wanted to stop but fighting past that wall is the way to improve.
This actually turned out extremely useful doing this car as our client brief is set in the 1960s so i can use my mini with some minor adjustements to match the 1960s or previous model of the classic mini to go into our project. Due to my car the group wants me to do vehicles for the level as its not the easiest of modelling tasks. Automotive modelling really appeals to me and id like to pursue it further and improve more. Any feedback on my mini would be hugely appreciated and beneficial to my progress. Thanks.
UPDATE:
Due to uploading for feedback and critique on polycount, i have been advised to show my wireframes in my showcase of my model. So here are some additional images with wireframes.
Pt1. Find or Research your chosen vehicle for use of reference when modelling (Your car/ images/ sketches/ owned item etc.)
What was i going to do? there is a wide range of choice and being a huge car fan i had to go down that path. Personally owning a classic mini i thought i would go for that…but then i didnt want to jump in head first with this i could come back once i felt id improved my 3d modelling. In relation to the brief it says representation of a vehicle so i decided a remote control car would be a fairly challenging model to build to start me off with this brief, and i could also build the remote to control it.
With that in mind i set to the internet to find myself some reference images, maybe some parts i could add like a spoiler of my choice as rc cars are customisable.
So this is what i found, simple shape with plenty of features to model. like the suspension springs, screws, spoiler, wheel, tire tread, antenna etc. The reason i picked these angles as when i am modelling in 3dsmax if i set up 3 planes evenly and texture the images into viewport i can use them whilst modelling to guide me in shape and size of my car. I think i will do a slight interpretation on some features due to topological difficulties but we shall see how it goes.
Pt2. Once comfortable with chosen vehicle (it has to be real, no transformers allowed!) plot yourself out a design process to tackle in 3d modelling.
I realised that doing an rc car i could cut a few corners as there is no interior and just a base so one moulded block would show a built rc car under the shell. But first things first i set myself up 3 reference image planes top, front and side. This would allow me to get the scale of my model right in at least 2 viewports for accuracy to the model.
As you can see evenly measured planes that have been aligned together with precision, this was just a simple process of create plane to scale, clone 2 times and match, then texture each individual plane with relevant reference image. I then selected all 3 and clicked freeze selection so i wont even move them by accident, it wont be changed.
The next step was the car shell, as i dont know what the frame looks like i decided to do the main car shell then model the frame to match the shell based on what id made.
The shell started off as a simple box that i scaled to match each viewport as close as i thought i could go, but obviously there are many curves and bumps in the car so a box would look right at all. By converting to an editable poly this allowed me to use the connect tool when selecting edges, this is similar to the swift loop tool but if you do it in multiple connections its more even topology. I then just grabbed vertexes and moves them to fit the shape of the model, i did this in side and front viewport so it had the reference shape as if i did just side view it would be wrong. I then deleted all polys underneathe the shape as its just a shell and i didnt need them as other objects would fill that space. But as you can see thats far too sharp and boxed to look realistic it need smooth transitions of bends and shapes.
To do this i added a turbosmooth modifier, which gave me the curves i wanted i upped the iterations to 2, turned on isoline display and clicked on show end result when going back to my editable poly. i used the swift loop tool to create some air intakes front and back. Obviously i wanted to show definition of the centre piece and the intakes so a trick i learnt was to use the swift loop tool whilst turbosmooth is on and the closer to the line it is the more pinch it will do to your tubrosmooth to make it a more solid shape. With being pretty happy with that shape and it being modelled to the reference images i decided to leave it for now and move on to modelling another area of the rc car. to make the topology neater when i swift looped I moved selected ringed edges and use move with edge restriction to even it and space it all out.
tire modelling step 1
turbo-smoothed
I proceeded to the tire, from the reference image it needed to be fairly thin with a bit of a outer ridge like a tire does. I did this initally using spline modelling techniques, i put it in the front view and used lines to draw the shape of the tire but only from top to where the rim would be not the full tire otherwise my chosen modifier next wouldnt work. I then used Lathe modifier in the X direction to create my geometry, but it wasnt in the right axis, using the sub selection of the modifier axis i used the move tool to drag it down and create a tire shape with a ring in the middle (where the rim will fit). to create the smooth inner tire bump i converted it to an editable patch and used the inner handle scaled in the Y direction to curve this out and create the tire.
The rim was created by a tube aligned to the centre of the tire and a cylinder with matching segments to the tube facing eachother so that i could use bridge to create the spokes. Then it was just tweaked with a centre cap which i modelling a screw to fit inside, it was turbosmoothed and swiftlooped to pinch the shape and create our wheel in completion.
helix spring
rendered in viewport thickness of spring
After that i duplicated the wheel when grouped together to have 4 copies for the car aligned them and positioned them to individual locations. This allowed me to model the axel and wheel connector to the axel. I then began to model the spring suspension for the car which is clearly visable at front and back. Being a spiral shape the best thing to use was the helix shape which is essentially a spring, once aligned to my object it was just a case of making sure it looped as much as i wanted to and tighten it up around the cylinder of the suspension with height and radius. Once happy all i had to do was go to the rendering option on the modifer toolbar and tick enable in viewport and renderer, this then thickened out my helix to a 3d spring which i could adjust thickness and sides for however high poly i wanted it.
I then added tread to my tire, this was just cubes modelled on the surface on the tire cloned several times in a row of 2 then every other cube being deleted to create a tread, once angled the tread on the inner part of the tire it was duplicated with the axis set in the centre of the wheel using the rotate tool on snap holding shift.
To speed things up i made a list of what needed doing to finish the car. I needed to model: a frame, a inner car carriage with battery latch, spoiler joined to frame, bumper joined to frame, a car antenna, a remote with ariel. Then i needed to align everything in position relevance, make any additions i may think of, use symmetry for tires to the other side, texture.
Here is the remainder of the process as this post is getting very lengthy and images speak a thousand words, maybe not in 3d modifiers but i will explain where needed.
I modelled the frame using box modelling to create the outer edge path of the car once donei used the symmetry modifer to mirror this to the other side, and to make the support connections down the middle i just extruded inner polygons where i believed nessacery. Then the inner carriage was modelled to fit above the frame but inside the car this made sure the inside of the shell wouldnt be seen and gave depth to the model with a simple addition of a inset battery box with latch. I then made the spoiler using splines for the edges of the spoiler and the handles of converting to bezier to sculpt the edges, then applying the extrude modifer for 3d element. Final touches were needed to the connection of the wheel to the suspension to the car needed a extra part and extrusions to make connections visable. Then it was final modelling of a bumper which was beveled to create what i thought was a nice solid look to the bumper, then the antenna for the car to recieve the controllers movement. Finally the controller was modelled, using topology creation in local for some features. It was all just a case of putting shapes together for the controller and extruding some polygons for features. And that left texturing after i added my air intake on top of the car which wasnt on the reference but i liked it as a feature.
Here is the final car!
This slideshow requires JavaScript.
I chose a random colour scheme and then added some racing stripes, a racing number, some form of zig zag decal, and some racing sponsers of NOS and Falken. All textured in photoshop. When unwrapping the shell i used the relax custom setting so i had a more even texture when applying my colours this really helped in the end. Also to finish it off and complete part 3 of texturing and organising, i grouped all areas to eachother and gave every part a name so there was no Box1001 and if this was to be passed down the pipeline in a game people checking or editing would know exactly what is what. Grouping is key.
Reflection:
Alot went wrong dont let the process fool you, i had many a rage storm out the room when it just wasnt doing what i wanted to with the topology, capping polys and actually modelling the frame/spoiler took about 11 times as it just wasnt transitioning from one to another right with the turbo smooth applied. With experiementing on many new modifiers i hadnt used before such as lathe and symmetry it took time to adapt to using them and getting my head around how i would go about the next piece.
In the end looking at the reference image i thought well that isnt exactly what is there for me to make. But you have to remember its just a reference image its there to guide not to be precisely replicated unless specified so i was pleased with my result.
One tool which was a total life saver that i was new to was the “isolate mode” this is a little pink light bulb at the bottom which when you selected what you was editing it would hide everything else and focus purely on that object. This allowed me to rotate around the object much easier and nothing was blocking my view. Other tools i found useful: local- this allowed me to move or scale objects i maybe previously rotates and angled in the direction they was facing so the objects local. AutoGrid- when modelling something i wanted on a surface so say the control sticks for the controller if i put on auto grid it would create my shape onto the controllers face.
Overall i was very pleased with my outcome for my car. I am hoping to now take this a step further and model a proper car using the skills i have obtained here. The poly count was just over 1.7million so high poly work but there was no restrictions and i did use only what was nessacery in some cases it could have been alot higher.
The technical language used within my last blog post on texture mapping is something i will have to become versed in. We have been told before that once we know more and more we will be talking in our own language of the work place this will help understanding between our peers when we do group projects it will be very benefitial for future career paths when we finish our degree aswell. That being said i want to research further into some of the techincal language i will be using the sooner i come to terms with it the better for me and my peers.
Here is some terms i have looked up and expanded on where i can:
UV: is Uv mapping in 3d modelling it puts a 2d texture onto the 3d model. You put your texture onto the rendered uv map once unwrapped using a program like photoshop then bring it back into 3ds max and bring it is as a bitmap and apply material to stage selection.
XYZ: This is basically the x axis, y axis and z axis of 3d modelling used to scale, move, rotate your model.
Vertex: is a single point on a model or a point in 3d space.
Polygon: it is a face of a model or a surface, can be made using 3 joined vertexes if you work in tri polys or using 4 vertexs if you work in quads (i work in quads)
Ambient Light: is the general light that illuminates the entire scene. It has a uniform intensity and is uniformly diffuse. It has no discernible source and no discernible direction.
Ambient Occlusion: or AO is a method for emulating the look of true global illumination by using shaders that calculate the extent to which an area is occluded, or prevented from receiving incoming light. Used alone, an AO shader, such as the separate mental ray Ambient/Reflective Occlusion shader, creates a grayscale output that is dark in areas light cannot reach and bright in areas where it can. The practical result is that the AO provides nice “contact shadow” effects and makes small crevices visible.
Anti-aliasing: improves image quality by smoothing such internal image edges. Antialiasing can be either on or off. Turn this off only when you’re rendering test images and want greater speed. Leave it on at all other times.
Axis: uses the xyz, used to scale, move, rotate your model.
Baking: allows you to create texture maps based on an object’s appearance in the rendered scene. The textures are then “baked” into the object: that is, they become part of the object via mapping, and can be used to display the textured object rapidly on Direct3D devices such as graphics display cards or game engine. You can render to textures using the Scanline Renderer or the mental ray renderer.
Boolean: combines two or more objects by performing a logical operation on their geometry. The objects typically overlap, but they don’t have to. The original two objects are the operands and the Boolean object itself is the result of the operation.
Parent->Child precedence: causes joints closest to where a force is applied (the end effector) to move less than joints farther away from the force. This is the opposite of Child->Parent precedence. Parent->Child precedence assigns the highest precedence to the base object and the lowest precedence to the end effector.
Compositing: The Composite map type is made up of other maps, which you layer atop each other using the alpha channel and other methods. For this type of map, you can use overlay images that already contain an alpha channel, or employ built-in masking tools for overlaying only certain parts of a map. (noun) A still image or a motion picture created by overlaying one image or motion picture with another. (verb) To combine still images or motion pictures by laying one over the other. Compositing often makes use of an image’s alpha channel.
Co-ordinates: The Coordinate Display area shows the position of the cursor or the status of a transform and lets you enter new transform values.
The information in these fields varies, depending on what you are doing:
When you are simply moving the mouse in a viewport, these fields show the current cursor location in absolute world coordinates.
While you are creating an object, these fields also show the current cursor location in absolute world coordinates.
While you are transforming an object by dragging in a viewport, these fields always show coordinates relative to the object’s coordinates before the transformation was started.While you are transforming an object, these fields change to spinners, and you can type values directly into them. This is an easy alternative to using the Transform Type-In dialog.
While a transform button is active and a single object is selected, but you are not dragging the object, these fields show the absolute coordinates for the current transform. See “Interface,” below.
While a transform button is active and multiple objects are selected, these fields are blank.
When no object is selected and the cursor is not over the active viewport, these fields are blank.
DOF: Depth of field is a multi-pass effect. You turn it on in the Parameters rollout for cameras. Depth of field simulates a camera’s depth of field by blurring areas of the frame at a distance from the camera’s focal point (that is, its target or target distance).
Extrusion: It moves your polygons in or out dependent on the value you set, i use it alot in modelling and is very useful for modelling in general especially buildings. here are the methods for extruding multiple polygons at once:
Group Extrusion, takes place along the average normal of each contiguous group of polygons. If you extrude multiples of such groups, each group moves along its own averaged normal.
Local Normal, Extrusion takes place along each selected polygon’s normal.
By Polygon, Extrudes each polygon individually.
Extrusion Height, Specifies the amount of the extrusion in units. You can extrude selected polygons outward or inward, depending on whether the value is positive or negative.
HDRI: The Radiance image file format is used for high-dynamic-range images (HDRI). Most cameras don’t have the capability to capture the dynamic range (the gamut of luminances between dark and bright regions) that is present in the real world. However, the range can be recovered by taking a series of pictures of the same subject with different exposure settings, and combining them into one image file. Also they have an accurate white balance that will bring convincing and colorful lighting into your scene
Material: Found in the material editor, can give many different effects to a model by applying a material, but to have it in a game engine you need to texture it apply the texture into the material editior as a bitmap then apply to model.
Quads: 4 vertexes joint together form a quad which is a quad polygon. used mainly in modelling as when you import your model into a game engine they like to convert models into their own specfic form of tri polys.
Tris: 3 vertexes joing together form a tri which is a try polygon. you can model in tris but game engines like to have there own coversion of tris so its easier to model in quads.
Mesh: is a type of geometric model of a 3d object in which the basic shape is made up of points, or vertices, connected by edges. The renderable surface of the mesh object is made up of faces or polygons that connect the vertices and edges. Examples of mesh objects in 3ds Max are primitives such as Sphere and Teapot, as well as Editable Mesh and Editable Polygon objects.In 3ds Max you can edit a mesh by transforming, adding, and deleting the various elements, or sub-objects: vertices, edges, faces, and polygons. You can also apply various changes with modifiers.
Tiling: The Tile option in the Material Editor is on by default, repeating the image along the U and V directions. You can use the Tiling values to scale the map image. Setting negative Tiling values increases the size of the image. You can also set tiling values in the UVW Map modifier. These settings are in addition to the tiling values you set for the map in the Material Editor. If the map’s base tiling parameter has a value of 2.0 and the UVW Map modifier has a tiling value of 3.0 for the same axis, the net result is 2.0 x 3.0 = 6.0. To avoid confusion about where the tiling is coming from, you may want to set the map’s tiling in its base parameters or with the UVW Map modifier, but not in both locations. The Mirror option is a variation on the Tile option. Tile repeats the image side-by-side, while Mirror flips the image repeatedly.
This is just handful of technical terms but i could add to the list massively with the world of 3ds max being ever expansive, my tutor paul has been doing it for 13 years and still doesnt know all the program which says alot. most of the definitions i got was from 3ds max help an extremely useful website that i will definately be using in the future if i have a enquiry on 3ds max.


 The information in these fields varies, depending on what you are doing:
 Group Extrusion, takes place along the average normal of each contiguous group of polygons. If you extrude multiples of such groups, each group moves along its own averaged normal.
 Local Normal, Extrusion takes place along each selected polygon’s normal.
 By Polygon, Extrudes each polygon individually.
 Extrusion Height,