Continuing on from the previous Game Jam (Plant Trap) our tutor decided to organise another game jam to once again give people the opportunity to gain extra credit. With this Game Jam my team was Me, Phil, Mark and Shane. The topic for this game jam was an application (mobile game) and we have to have 1 main character, 1 main mechanic and 1 environment. We could do this however we liked to build any game we wanted along as it tailored to these categories. To begin the design process as always we planned our what makes a good game. We went down the route of mobile games being addictive, fun to play and easy to pick up. Due to this we collectively thought of examples of games on our phones:
Flappy Bird
Bloons: Tower Defense
Paper Toss
Angry Birds
These are just a couple of examples, from this we determined that animals in games birds and monkeys etc. So from that we tried to list as many animals as we could that potentially had or hadn’t been done. From this we narrowed it down to a Mole, obviously games like Whack-a-mole are in existence but we could do our own game with a mole character. From this somehow we decided it would be fun to make him a funky disco mole with huge sunglasses and an Afro who has friendly disco moles and rival gang moles trying to sabotage his funky life. Alongside other moles trying to sabotage his mole hill we looked into common predators for moles, this came back with snakes so another enemy designed was a snake. Then to gain a life we had what moles like to eat which is worms once you collected enough worms you gained a life. My personal involvement in this project was in 3D and HUD, I designed the main character also known as “Molevin” it was a really simple design but could be edited and re-textured to create other characters. Which is what I turned Molevin into the enemy character who had different attire wearing a vest and a top hat with a flower in, then for a boss I scaled it up added a bandanna, match in his mouth and a bomb in hand with gloves on. Simply by reusing and editing the initial main character I created 3 characters for in game use good, bad and boss. I also created a tree stump that i projection painted using a mudbox preset to be used for the environment which wasn’t implemented in the end due to it being a unnecessary obstacle on a small environment game but it was used in the Game Over screen to add a visual. The environment is a field and the mole sits in the middle in what was supposed to be a mole hill but its more of a ditch at the moment. It has randomly place assets of grass and stones in the level just to add to the visuals.
This is my work for the HUD designs, using Photoshop to create simple circle icons, i took images of the characters to link it directly to the game, good guy is people saved, worms are lives, and the enemies are how many you have killed throughout the game. Very simple icons but still useful for covering the HUD elements in the game and also with it being a mobile game we didn’t want too much going on to get in the way of the game so small simple icons were effective in avoiding too much distraction from the game.
Here is the in game screenshots of the working HUD and game with my characters in. The menu system, game over and leaderboard design was made by Mark using the custom typeface we created by using a paint brush to go the font on paper then scan them in to be textured on the signposts. Mark used assets from all team members to piece together the menus, start featured everything, game over features the bad guys to symbolise they won and you lost, then the leaderboard was just visual models like grass, rocks and tree stumps. This game I had quite a prominent role in the modelling due to my increased skills over the year and primarily being the more advanced modeler in my group. As for HUD designs I was pleased with my products as they was simplistic but worked well with the theme of the product. As for the game to evaluate it we was very pleased with the end product it was fun and addictive players had to click (or tap for mobile which didn’t work) the enemies to kill them (1 for standard enemy and 2 for the snake). This racked up your score for kills and the aim was to last as long as possible as move and move waves of good and bad characters came into the level at varied speeds and difficulty as it progressed. Only disappointment I had was that my boss character never got time to be implemented but like the other game jams if we had time to progress we would implement a boss level for example. This was my personal favourite of all the game jams as i liked the style of game we had created. I’m looking forward to next next game jam which is in Cambridge Jun 2015.
Here is the video footage of game play from Mark Shaw’s YouTube channel:
In July last year I entered my first official Game jam, this was run by JAGEX at their studios in Cambridge. We entered as a course and took 6 members and our tutor with us to form a team (Paul observed and graded). With this being right after the end of first year it was great practice to keep the ball rolling with work and improving all the time, the most valuable part of it was being part of a mixed team with 2nd years this allowed us to work with people who was further along in the course to try bring us up to speed for this 48 hour straight game jam.
The theme was “cycles” due to the Tour de France taking part at the same time. We could interpret this theme how we wished so it didn’t specifically have to do with bicycles, to try and expand our area of “cycles” and find a idea to build a game we sat in a group and threw down anything we could think of to do with cycles this included ideas such as:
cycling
recycling
life
day/night
water
These were the main features we could come up with and eventually we settled on a slight incorporation of a few of them. We pinned down a cyclist who is in a dream and he has the power to change the day night cycle to solve puzzles and piece together his bicycle. So it was a puzzle 2.5D side scrolling game we decided to go with to support this and it was fairly basic to do in a shorter space of time, showing we didn’t punch above our weight implying we would do a fully immersive 3D environment with multiplayer online time trials.
My role in the project initially was alongside Phil to sketch up some level designs, so plan out issues that the player would come across forcing them to go back or use the power to change the day/night cycle. We decided that a journey from city to countryside so sort of a race in his dreams to the start line of the race, settings would go from city to park to village to countryside (hills) to start line. This was obviously ambitious to have 5 environments in the final project but at least we had considered how the game could have gone forward with extra time.
Then after level design I worked on hand painted texturing of the level, my limited skill in texturing at the time Paul suggested I used Mudbox’s projection painting. This proved very quick and useful granted it wasn’t all perfect when it came to bricks but with the time length of the project the visuals was still impressive. I then used this to projection paint graffiti onto a bus for the city level, I did this using many iconic game characters and general graffiti (even had Banksy art on the bus). Then I modeled a taxi (this first ever car I had done) which I was very pleased with at the time for the quality of my 3D and it actually made me pursue automotive modelling throughout the summer. Alongside general texturing of other peoples models and doing little assets myself I then took it upon myself to think or a name and design the logo.
Here are all the contributions to the game jam I could recover:
This shows my work in level design, hand painted texturing and models.
Here is my logo designs I tried to tie all the theme in of cycles to the logo as well and with it being Tour de France “Le Cyc” seemed relevant, here it is:
Admittedly a quick logo at best but you can see the idea behind it with the “cyc” making a bicycle, with more time alot of this would have been alot further along, some models didn’t make it in but nothing is wasted as if we was to progress this idea at any point we have put in the work through a design process to easily expand on what we have.
To evaluate the game jam overall it was a very worthwhile experience for myself, it allowed me chance to work in a team to push along together with a 48 hour deadline, which testing teamwork, communication and overall commitment to stay awake and work. I have taken alot away from this game jam in relation to how my 2nd year has gone, I view it as the starting point of my 2nd year to push on, after I began work on my personal classic mini project due to enjoying the modeling of the taxi. One thing I have reigned in is the graffiti, granted projection painting was very enjoyable and produced decent results but graffiti took over my game jam i remember doing it on a coke can just because I could, should the opportunity ever arise in a project requiring graffiti you can be sure I have it covered though.
Despite not winning on this case the JAGEX judges was impressed with our work and the visuals of the project. Most of the other teams was programmers which we didnt have any we are all artists so naturally our game would look better but maybe not play as well, but personally I think what we produced with the issues James had with Kizmit on his own was a great achievement. Maybe a programmer would be advisable next time but now our knowledge in blueprints is more that enough for a Game Jam so we should in future have a visually and interactive game, to hopefully win with.
In the last few sessions I have mentioned that i had been in contact with St Stephens shopping centre in Hull with intentions of securing the group with a opportunity to showcase our client project’s current stage before our hand ins. After several days of contact and acquiring the necessary documentation (public liability insurance) from Hull College I had us booked in for Friday 15th May from 10am-4pm. With this secured the client session before the showcase as team leaders we sat down and emphasised focus on promotional materials, this had been tasked a few weeks before hand but little progress had been made to our understanding. When it came to Thursday the day before the showcase and no evidence of a leaflet or any other promotional materials had been presented we took to informing the tutors on our current issue, to resolve this Gareth stepped in to help us design and piece together some promotional materials.
To assist Gareth I went through any files i had that i thought could show the public our design process over the year of work. This included Concept art, renders, screenshots of 3ds max progress, sketches, research wall photos, designs, ideas, group meeting photography, and other helpful images. After collecting work of my own I had asked other students in the studio if there was anything of use they feel they could put into these folders allowing Gareth to have a pick of the bunch. James put in some concepts/research and Viktor put in some step to step and final production of sculpts and his bank. Phil also gave Gareth some seperate renders which was used for the leaflet designs including the 3D version of my signpost logo sketch.
The logo sketches I did on Tuesday, Viktor had already done a logo but there was some debate on the design of it due to the inclusion of Hull and crowns which may spark some currently unknown debate from any public members. Due to this some sketches of logo ideas using reference from crests, shields, 60s logos and items in the street I did just to give us a wider range of choice in the logo field. Here are my results:
Many people liked the signpost logo with the Old Town Memories font in the style of the street signs currently in the street which was there in the 60’s so it had accuracy and relevance to the project. To try get different perspectives and cleaner visuals of the logo Phil decided to take the basic street signpost logo into 3DSMax and I took the street signpost with the lantern into 3dsmax.
Here are my renders of the 3D logo:
With this i felt that it was decent but the logo design in realistic 3D didnt work for me it just didn’t feel right. The next step for this would be to take it into Photoshop and overlay correct type of the street font then add colour, or texture it to create the same effect. With limited time I left this to Phil to progress on his logo whilst I contacted St Stephens about transport of the television to our display area and sign in requirements for the group. Due to St Stephens fantastic customer service the reply was very swift and we cleared any possible issues for the showcase.
Now with the showcase closing in its important that we consider a few things to do with professionalism whilst displaying to the public:
Information- give informative replies to any questions in a polite and controlled manner. Do not over explain any technical terms to the project but also dont be condescending towards the public treating them like they know nothing. for example instead of talking in depth about the process of 3D modelling and using modifiers to shape a certain complex shape which will be later unwrapped using the uvw unwrap to take into Photoshop, ndo2 or other programs, simply say to create the models of the buildings and assets you see we use 3d software which allows us to place them in the game world (engine) as you see them now. Its not over informative but its also not too complex just to the point and well explained. Let them know that this is a working progress and to keep an eye out by taking a leaflet as we will be doing the final product display in September.
Presentation- This can fall under a few categories:
Clothing- Dress smart or smart casual, you want to be approachable and presentable. We are representing our course and college so it is important to give ourselves and them a good image. My personal attire was a suit blazer with polo and jeans.
Layout- The project is in the middle of a shopping centre with many people walking by to draw them in we need to have a well laid out station with regards to promotional materials and availability for them to be seen and picked up easily. The layout I placed 3 leaflets overlapping each other to add a personal touch to the space and then we had plastic holders for the leaflets placed on the stand in front of the TV but not obstructing the view of the video.
Video- The main piece we want the public to see is the video which is a fly through of the project. With help from Gareth he pieced together using our content and previous video a professional informative video for the public to view.
Presence- Using our shifts each person had to man the project with another colleague, our time around the project was there to draw people in. But in the times where little interest was given we must ensure that we do not obstruct either the view of the project stall or the public’s path. The general position of one man at each side of the TV was assumed by most groups. Another thing with this is posture, to be standing upright and approachable, this means no slouching or leaning or hands in pockets as it just doesn’t portray the right image. We need to look as enthusiastic and professional as possible around the project so that the public might be interesting in taking a look.
Teamwork- Due to our idea to have shifts for teams of 2 at each interval we need to communicate between each other on overlaps. This means when handing over to another group to inform them of any interests in your shift, what to do with the documentations and forms if somebody wants them, handing out of leaflets, and any issues that have been raised throughout the day. If any problems arise the scheduled rota’s for each team was on the sheet along with contact details so people could come help.
There are other things but them 3 I believe are key for us to be successful at our first public showcase of the project.
On the day of the showcase Myself and Phil was first on the list, due to my contact with St Stephens I was in charge of signing us in, finding out our location and then setting up (Phil set up too). Also I made sure that as its a public place and St Stephens usually prohibit photography in the centre that we was alright to take photos of us and our stall to add visuals to our evaluations of the day, this was confirmed fine by the staff. Once set up it was around 9pm but the requirement was to be set up by 10pm so earlier we set up the better and we could get started. Barrie also brought us down some freshly cut doorstops as we had a wheeled TV stand and St Stephens is on a slope, so just for safety precautions we felt this was a necessary to have done.
Immediately we could notice that earlier on we might not have much interest, people was on the way to work, getting breakfast and so on. There was time for a quick glance but not many stopped to talk to us, this we felt was natural with it being earlier on and expectations for more viewers would come later on in the day dinner time onwards. Our people skills generally improved over the time as first we didn’t want to bother anyone as we personally know how frustrating it is when your going somewhere and people try stop you in the street, but we realised this is for the project so anyone slightly tempted is a bonus as then the public can give us their thoughts. Yet despite rejection and disinterest from people walking on past we needed to show our professionalism by keeping a calm level head about it all to try get others in.
I had an idea to employ Skinner’s operant conditioning into our showcase, i went to Tesco and purchased some sweets to place behind the promotional material, if the public came and talked to us or viewed the project they would be offered a sweet as positive reinforcement for supporting our work. Just a little touch but employing game theory into our client showcase was an interesting method to test.
In my first shift with Phil we had 9 people come see us 6 being people from the course but still wanting to know how its all going and what we have done. One of the other 3 was a lady from Historic England and she was extremely interested in the project as it was quite convenient she had just come from a meeting about heritage projects and just so happened to run into us which was great. After explaining our work we exchanged details for contact for further information and a potential future client, she mentioned about our impressive 3D work and how they could use it for 3D visuals of building design planning before the real builds. This was really great for us as we sold the project so well to her Stephen was also with us as it was the beginning of his shift and helped explain everything to her. She walked away impressed and enthusiastic which gave us a great confidence boost and vibe about the work and the benefits of the public showcase.
After our shift the only issue that was raised was from Abbiella, upon coming to check up on the group see how things were going and give a bit of advice she had been told by the previous group not to take any photographs at all. After visiting the staff as i said before this was cleared up and use of photos was perfectly alright for our own personal use. With me previously posting an image to Facebook to let my friends and family know of our presence in the shopping centre I decided to try take it to the next level. Not many of the leaflets had been taken which suggested at nearly 3pm loads of people hadn’t come and spoke to the other groups. With that in mind we have them as hand outs, so I decided to go into GAME to ask if I could leave a couple on the counter to get people to maybe notice we are games designers and not a charity like most of the other stalls. GAME kindly accepted to leave them there and actually offered to tweet that we was there as well, which was brilliant and also a shame as I had only thought of doing it 1 hour before we packed up. But we know for next time that potential nearby stores might be worth placing a few temporary promotional materials in just to try attract anyone who may have missed it. With 1 hour left James decided to stay behind after his shift into mine and Phil’s second shift to help out, with the extra man we sent James to the front of St Stephens with the majority of the remainder of the promotional material to hand out to passing people informing them of who we are. This attracted a few in but with saying the final showcase was in September maybe people wasn’t as interested until the final product. Nevertheless personally as the day went on confidence grew and more ways for developed to try bring people in which we can take into any future showcases of the project.
It was time to pack everything up so Paul came down prior to 4pm to check up on us, then Me, Phil and Paul packed all the equipment away and put the TV back in Paul’s car to be taken back to the studio. With the day coming to an end I decided to go thank the St Stephens staff for all there help with our showcase in the day and i also sent them an email when i got home to once again thank them and notify them on how this has benefited us as students. I will also type up an email to John Netherwood sometime next week to thank him for allowing us the use of the TV and stand for the project.
To evaluate the day I have to say that as a team I believe we did a great job in all professional aspects especially presentation. The best thing we can do from St Stephens is to treat it as a stepping stone, for the next showcases we will have further progress in the project, better promotional material, better people skills through the experience and understanding of our surroundings. The day itself is just the first in a run in to the final showcase on September, but the more we can do and practice then the more effective and professional we will be when it comes to that stage. Allowing the public to see the project at its current stage which we was hoping to be alot further and still see the amazement of how we do what we do and praise for our work is a real boost for us to push this as much as possible into September to really impress people, hopefully anyone who obtained a leaflet or information from us will see us again on our next showcases to see the progression and keep an interest in our work. We also need to set up at least a blog or a official website as people did ask for this as none of the online presence was on the leaflets which was a mistake on our behalf only contact information, so we could only direct them to Facebook, Twitter or YouTube which honestly haven’t been used to the full potential so for future we need a working website.
What we hope to have for next time or prospect centre when that is confirmed is the interactivity side of the project fully underway, we have 3 TV’s at our disposal so the set up with one of the professional video fly through we had in St Stephens, then another similar style to where we are now and then the interactive version would be a great way to display our work. On the day we felt that from our experience with “Rush n Crush” that me and Phil noticed people were more inclined to pick up and play rather than watch, yet that might not be everyone’s preference so different set ups one being more visual and informative and the other playable would attract a wider audience.
Here are all the images from the day that I took including images of other groups if they requested it and the leaflet designs on close up:
Stand backing
Leaflet
As for the sweet and employing operant conditioning, not everyone wanted one but they seemed pleased to have the offer there. Overall a very good day and I would like to congratulate the team for all their efforts for people who attended hopefully we can take this into future showcases.
Here is the video fly through that we displayed to the public in St Stephens:
With time now before the next one we can edit this version that Gareth pieced together watch it make notes of what works and what doesn’t to improve on what we already have.
With the recent contact with St Stephens over publicly showcasing the client project I bumped into “Public Liability Insurance”, St Stephens required this to allow us to showcase the work. Now as a student I was unaware of the importance and requirement of this to display in a public place, so i decided to look into it to give me a better future understanding for any projects I or my group my showcase.
A public Liability Insurance is one of the more common insurances taken out to protect businesses, while it is not compulsory its highly recommended as extortionate fees could occur if they are not covered for anything that happens. The most general area it covers is that if any member of the public is to injure themselves because of your store/business or if another persons property is damaged when you are at work, for example a delivery driver opens his door onto another car and leaves a dent. Here is the description from confused.com on public liability insurance coverage:
So what does public liability insurance cover, exactly?
You’ll find that your insurance policy covers a vast range of situations, but generally speaking, a public liability insurance policy covers your business if someone is injured in some way by your business, or if you damage third party property when carrying out work. Bear in mind that even a minor scratch to personal property could lead to hefty fines, especially as you could be required to pay legal fees if the case goes to court, and these too will be covered by your policy.
When taking out public liability insurance, you need to tell your insurer what type of business you operate. This is not just for the sake of records, but will help you come to an agreement over the type of policy best suited to you – whether your insurer judges cover up to £1 million to be sufficient for your needs or if a larger policy of around £5 million would be more appropriate in the circumstances. If you work in the public sector, for example, you will often be required to take out a minimum of £5 million.
Don’t assume you will be safe without public liability insurance just because you run a small business, or because you don’t make deliveries. Something as simple as a coffee spill over a client’s computer, or a loose nail causing a customer to trip while visiting your office, could cost you thousands if you’re uninsured. –www.confused.com
This is quite an important insurance to have it seems, if we was to go to St Stephens and did not have this insurance and something was to happen the business we are working for (Hull School of Art and Design) would potentially get heavy fines which could lead to more fines if the case goes to court as then you have to pay legal fees.
In connection to us public liability insurance is clearly something we should and do have, I imagine for St Stephens if we didn’t have this insurance we would have been unable to showcase the product as partial liability would fall to them as they are accommodating us.
On the return of Easter as group leaders we was hoping to see our teams work over the holidays towards the project. Unfortunately when asked the majority of the group had focused on their self initiated projects instead of the client, this was quite disappointing as everyone was set targets and agreed to them before Easter. Nevertheless we proceeded with the group meeting after I stated to the group that we all agreed on a target and seen as myself and Phil was pulled from the project due to doing too much work on it and not enough on the rest of our work it was down to the rest to produce work.
With that all being said we had estimated we have around 6 weeks left due to no pinned down hand in dates, due to this we all agreed that to have a 2 week clean up period before the final hand in was a sensible action to take. This would mean we have 4 weeks to finish everything outstanding for every individual in the group, then those 2 weeks would be spent checking all the work for errors, bug testing the engine, and then correcting any errors that existed. This would be a similar procedure than what would be taken in industry, before a game would be shipped everything would be checked, checked again and checked again really. The final product is the key and will be on view to the public for example we don’t want to be explaining why that car is floating above a building its unprofessional and with this 2 week clean up period this should eradicate any issues.
Before Easter in the last session we had been trying to come up with a name for the project (see link for design process of name), with many being generated and one not particularly pinned down we decided to leave it until after Easter to decide on a name, this allowed anyone to have a think and possibly come up with a name for the project. With that being said we finally decided on my idea of “Old Town Memories”. I particularly liked the name because it had a soft ring to it, also it directly linked to our project with us designing a section of Old Town and with it being the 1960’s and most people will still be around from that time period remembering what it was like it would spark memories.
With the named being decided on the design documents for the public eye needed to be done. This would include things such as leaflets/flyers, concept booklet, logo/banner, and a bio of the project. This would be a general input from the entire group as the more input the better. My personal input was that we need a theme to it, a general style for each document which replicates over the other documents gives a professional look to it all. As for style i suggested as I did to David with the UI/HUD elements to research into fashion colour trends on the time period to try link it all in.
Closing the group meeting I emphasised the importance of communication, we need to talk people cannot be at any point in the dark now, if there are any struggles from any individual they need to be open about it so somebody can help to progress them further or take the work from them so its completed. Its crunch time and teamwork needs to be a priority.
Moving on, in-between session 20 and 21 we had a surprise meeting with our actual client John Netherwood the chairman of the Hull Civic Society. The required myself and Phil to take the meeting and introduce ourselves, our work and what we have done with the project. To have a quick and efficient way of showing the project instead of having them playing it, Phil made a matinee sequence which made a fly around of the project disabling all player controller input. Mr Netherwood arrived with his wife to see the project, myself and Phil proceeded to shake hands and take the meeting in a professional manner. We discussed current progress, features and our passion towards showing this to the public. Which we was confirmed with a venue of the History centre alongside the fashion students 1960’s project. Also a near certain of Hull’s transport museum in September when the Hull Heritage week is on. Then any other possible venues we would need to seek out ourselves which we had planned to do in the next session. We are also going to try contact the Hull Daily Mail to do a article on our work at its current stage and then a follow up of where it will be by the time the Heritage week comes around.
Overall myself and Phil was very pleased with how the meeting went, we stayed professional and happily had a back and forward conversations from questions posed from the client. Discussed what they would like to see from the project and so on, it was a really beneficial meeting for myself it allowed myself to gain confidence in talking to potential clients as we was naturally nervous about what they would think. They also liked the name of the project which was pleasing as we had trouble pinning one down initially so all positives came out of the meeting which was great for us.
Moving onto session 21 which will continue into Thursday as we presented all of our work since Easter on Thursday including the client work. Initially in the session we had a brief catch up on what work has been done since last week, this week we had a full group which we didn’t the previous week so everyone was caught up. After that Myself, Phil and our tutor Paul went to go try secure some potential venues for showcasing our work. This would test once again myself and Phil on our professionalism and communication skills. We initially talked to the Transport Museum in which we had to fill out a form to send to the governing board to approve. Moving on it was now open to us to try secure venues, we managed to get Fanthorpes on silver street and prospect centre as definates, then kapow, princes quay, st stephens, ferens art gallery as possibilities. Unfortunately a few no’s came with asking from shops like granger games and thats entertainment but we still tried, rejection is all part of it you dont get if you dont ask.
Then on Thursday we showcased our work for the client. My work involved completion of buildings on Trinity House Lane which were Wetherspoons, trinity market entrance, bob carvers, and Davids handed over building which is currently a coffee shop called Coco’s. I will now go through my building to their current stage from what I did in my presentation in a briefer form with a self evaluation for each.
This slideshow requires JavaScript.
These photos were taken by James Branson (his blog) when we all went out taking photographs in the early stages of the project.
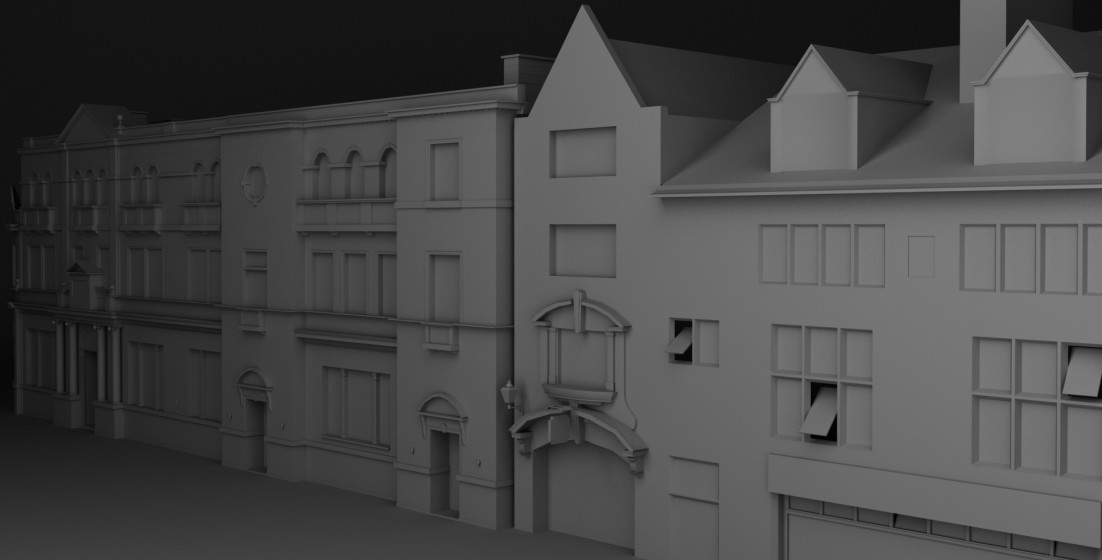
This is my model of the current Wetherspoons (we are unsure on the original building so may take artistic license to leave it as a pub until we find more). This building has taken me around 3 weeks with working on other things at the same time, as its a highly detailed building I think this is an acceptable time. I have put this down as finished ready to be handed over to the texture team and then to go in engine, the model itself could do with some time taken on optimisation but due to the upcoming deadline my time is better placed elsewhere as the optimisation wont effect us hardly at all and if needs be the texture team can go in to the model and delete loops or polygons to support the unwrapping. The building itself is 21,888 poly’s which with the fine details and complexity of certain features in the building I feel it is a realistic poly count. Issues I came across whilst modelling this was correctly scaling the sections of the building as it seems to be sectioned by ledges, putting the ledge in the right place so that all the window frames, pillars and so on was also to scale was key to the building looking correct. This took tweaking but im pleased with the end product and proportions of the build. The development in my modularity has aided me well in this particular building as extruding pieces like the window-frames, pillars, chimneys, lights etc was the same and only minor edits to the curvature on some parts was needed allowing quick development when adding a feature such as a window-frame. Overall being a later building in the year I feel my 3D skillset had progressed massively in comparison to initial buildings in terms of quality and speed, if any problems arise im confident enough now to quickly amend any issues.
These photos were taken by James Branson (his blog) when we all went out taking photographs in the early stages of the project.
This building is the entrance to trinity market, a fairly simple building that didn’t take me very long, as soon as Wetherspoons was complete the building speed increased rapidly. This building I have had to make sure it matches correctly with wetherspoons, i found the modelling of a section of a street so building sections together was far more effective as scale and alignment was much easier to achieve than when your working alongside another person and having to make changes once you realise in engine its slightly out. The building itself I found fairly easy as once again its a later building in my year and I feel more advanced in my 3D work. the only issues was to how to make the extruding shape around the first window in the lowest possible form, which i realise would be as a separate pushed in object to the shape rather than modeled in around the window. Generally the building was simple just swift loops for the windows of the building and door, then everything else modeled separately and snapped to the building facure. Another building im pleased with, finished and ready to hand over to texture and then go into engine. Only addition would be needed if texture team agreed would be the slight fence style look above the door which I thought could be done with a plane that they can make a alpha map to create the fence then a normal to make it pop. Thats only addition needed to this building I believe.
These photos were taken by James Branson (his blog) when we all went out taking photographs in the early stages of the project.
This building is currently Bob Carvers on Trinity House Lane. With this model once again the 3D capabilities are there too do buildings like this with good speed and quality at a good optimised level of poly’s. Not many problems came up, due to this i decided on certain windows when we walk past are sometimes open, all i had to do was select the window poly’s detach them from the building then rotated them slightly to give the impression that the windows are open. The group gave me great feedback on this saying they loved the idea and it makes the building looked alot more used and lived in even just with the simple open window rather than a plain shop facure. Again it was just getting the proportions of the building right in relation to my other models and using gathered photography this was made alot easier. I think of all my buildings I like this the most purely because of the windows, it just makes everything look more real and alive. Obviously I will need to make a simple box to simulate a interior as the windows are open and if a player angles it right they will currently be able to see the sky so a simple box interior will solve that problem.
These photos were taken by James Branson (his blog) when we all went out taking photographs in the early stages of the project.
This building is currently a coffee shop called Coco’s, this was originally another students building (David) but he handed it over to me for optimisation and the addition of an interior. I had decreased the poly count from just over 1000 to 238 and that was with adding an interior with shop window showcase area. Being a very simple building I dont really have much to give feedback on, its a basic building which took no more than 30 minutes to optimise then add the interior section using simple edge modelling workflow to then bridge the gaps. I did notice one issue, nothing major but pointed out in the presentation id overlooked the way it had been done at the front with the windows, and this results in N-gons in the gaps either side and between the windows. Simple fix with connect or cut tool. All of these buildings are now ready to be handed over to the texture team.
Here is a few pictures of the complete street section on Trinity House Lane:
I found that modelling a street section was far more productive and beneficial for myself as a 3D modeler. This was because mainly the dimensions, scale and proportions of buildings, I could use the other buildings i had completed and finished to adjust the new ones to make sure the street looked correct. This worked both ways as any misjudged dimensions could be effectively grabbed and moved into place.
Then for Silver Street I have finished RBS and started the silver street entrance to trinity market.
This is currently RBS bank building on Silver Street. Once again a very basic building wasn’t much to it just a few insets for windows after I had added loops to extrude some ledges. Because of the simplicity of the building I added a small shop window interior so that there is potential to turn it into a shop if we find out the original status of the building and if we don’t then an artistic decision will be made to adapt the building to possible a bakery for example.
And finally from the buildings i presented was the beginning of the silver street entrance to trinity market. This is a fairly complex but also modular building for frames and decorations, then a symmetry modifier applied will allow me to easily check the finished building as its only sensible for speed to model half the building if its complex when symmetry can do the work for you on the other side. This building is currently stalled, this is due to the final hand ins coming to a close we have decided for hand in and the public we have to focus on the texturing of Whitefriargate and Parliament Street, all other buildings will be put in with the basic grey block in the background to suggest that the area is under construction and will be completed for main showcase in September.
After we had presented I took the role off Abbiella to create a professional email so that we could email the clients that we had and hadn’t discussed potential showcasing for the project with. This required me to type 2 emails, both similar but adjusted for seen and unseen clients. Once typed it up I asked my tutor Gareth to have a proof check to see if anything could be improved or any key information had been missed. The final email also had a link to our latest video fly through of the project so that the clients could have a quick taster to what we had been working on and will be showcasing.
This is also the grey block video fly through we showed our client John Netherwood when he came in. I disclosed that this is not the final product but an in progress project we gain alot of benefits from public showcasing for our marks and the projects quality. This final email was sent to Fanthorpes, St Stephens, Prospect Centre and Princes Quay.
After waiting a few days I had successful replies from St Stephens and Fanthorpes confirming interest in allowing us showcasing our work. Fanthorpes was already secured from speaking to the shop manager originally but St Stephens was a fresh attempt of securing a client by myself. Since then myself and St Stephens have been in contact discussing the project and when we would like to showcase it. Coinciding with there times and available for displaying space, I managed to get us a showcasing date before our hand in (19th May) which is Friday 15th May. This required us to have a Public liability insurance cover which initially i didn’t know if we have but with contacting my tutors we do have a copy to send to St Stephens and prepare for Friday. Our location is just outside the elevator near the bagel food vendor stall, next week I will discuss with the group on shifts for the showcase as I personally would like people to man the project in-case any of the public wish to stop and talk to us about what we are doing.
A slight issue with St Stephens arose with my tutor Gareth with that it is the shopping centre/ area that has crushed the Whitefriargate area for business and popularity. So when we showcase there as long as we are displaying it as a student project following on from the previous years of the heritage project and our area is a section of Old Town including Whitefriargate, it can be clearly seen as a project rebuilding an area of Hull in the 1960’s and not a display to support Whitefriargate. This turned a few of the group off as they don’t really want any hassle from the public but at the end of the day its an opportunity to showcase our work that i have secured before hand in so participating in it will add to our professionalism and “getting our work out there” for feedback/review.
Will this just around the corner next weeks focus as that is also the session all the texture team should have the Whitefriargate and Parliament Street area textured, so the focus will be on promotional materials for our project. Any promotional materials we have can be a extra visual for the project for the public to have, which will aid them in understanding the project and what we do to make it what it is.
Through illness I missed one client session but have been informed by fellow students on the goings on of the project. In session 16 (my absent session) the group held a group critique so that we could evaluate if the new formed pipeline and sub-teams are working more effectively than the process we was following previously. From what ive been told much higher quality work and amount has been produced since the formation of this pipeline. This pleases me greatly as the method of industry practice that we have implemented has worked and collaboratively we are now showing that we can work as a team effeciently. For the rest of that session everybody continued with the work already tasked to them after Phil had introduced to the group the research on PBR (Physical Based Rendering), with a little bit of research we realised that UE4 our engine is a PBR engine, therefore all the texturing we have currently done is not going to be the standard it could be if we did PBR methods.
PBR basically deals with light naturally like it is in real life, the most common maps to use are diffuse/albedo and gloss then you can apply normals and so on. Basically with PBR there is no need to adjust brightness/darkness on your textures for different lighting in engine it is one texture that works for all the albedo map has no lighting information on it so its all calculated in engine. It the latest exciting thing in games that is currently being used in next gen games such as RYSE and Dragon Age Inquisiton.
PBR is briefly explained here:
Then an example of how amazing PBR can be is demonstarted in Quixel’s Demo Reel here:
A brief glimpse there of the types of maps all used just to make a incredibly realistic leaf. If we want our project to look and feel real we have to really look into this and learn the tips and tricks behind pulling it off for the project. I found this demo reel after a bit of PBR research one night and then showed it to the group, it just proves how amazing the detail can be all in texturing we just need to knuckle down and work it out to maximise the potential of our work. This project using PBR could we a fantastic porfolio piece, so this is now the art teams main focus.
Moving on to session 17, I return still not 100% but I dont like being off. The begin the session Phil had been showing me his progress on a portion of the street he was remodelling from semester 1 which he had now included shop interiors, this had been discussed earlier on in the year but never materialised. Now to show what it would look like and how it would be done Phil showed his work to the group and we delivered a group meeting based on interior design for the buildings. We stated this would not be applicable for all the buildings as we may be trying to run before we can walk but certainly for certain shops that we can show off 60s fashion, music and culture this oppurtunity shouldnt be passed up. This means more work for me and my 3D team but it will be beneifical for the project, one of the feedback notes we was given for the project at Hand in is that the shops dont look realistic when looked at because of the shop fronts/ windows by modelling a simple interior (possibly inaccessable) it creates a more naturalistic feel to the project that will further immerse the public in our work.
We then proposed to the group to do a section of the project each for my 3d team. By doing this models should all meet up correctly, be to scale, and having multiple buildings produced side by side by yourself will be great for a porfolio piece. The street i chose to take was Silver Street (Right side) this was because i currently have wetherspoons on trinity house land which goes round the corner onto that side of Silver Street so its only logicial to continue with that area. The street section chosen by each person will require them to model interiors (where applicable and approved by myself) and all assets related to that area of the street. For example if my street has a flower shop, that would require me to model flower shop related assets such as a flowers in a vase to go in the shop window.
After this i had a little talk with Paul my tutor, he expressed he is pleased with the groups advancement and focus since the return but as team leaders myself, Phil and James need to keep a close eye on who isnt working enough. To tackle this Paul proposed we set weekly tasks to the individuals in our team to complete by the next client session, this will make sure people have a sense of deadlines and produce the work. Now as a leader i have to dicuss with my individuals what they think for them is achievable in that period of time. I explained to each one of them this will be a trial and error thing what do they think they can do in a week and what they actually can do, so one week i may realise that as Viktor has sculpted a statue by friday instead of tuesday is that he has been under tasked so in coming weeks a balance can be formed to how much they can do. Its a test to show that those that might not always be in fifth gear if they complete an amount of work then underachieve in the following weeks they should be working harder as i know they can.
Alongside this obviously i have to task myself some work to do. Currently im working on wetherspoons on trinity house lane and my new tasked street is Silver Street’s right hand side.
This will be very helpful for the speed of the project, the sooner we get the streets done the more time we have to fine tune and improve every aspect of our work. With 9 weeks left times running out for us but we can do it.
Following on from last weeks session we asked the group inidvidually what area of work they would like to be in for the rest of the cleint project. As explained last session this is purely to try maximise workflow getting people to work in the area they want to go into industry with for the majority with other areas on the side. This group session really felt like we had all clicked and finally collaborated to try maximise the potential of the project.
Here is what we came up with:
3d team is myself, Viktor, Brad and Rinalds with myself as leader.
Art team is James (wolfy), Barrie and Abbie with James as leader.
Engine team is Phil, David and Steve with Phil as leader.
Steve, Viktor and Brad was absent for this session so as leaders we placed them into the teams that we felt they are most effective in and want to do in future.
group planning
collaboration
communication
We then sat down and discussed the plan of action (POA abbreviated) for each of the teams and how we would collaborate between teams. For my 3D team we set a target of a street a week, this maybe rather high expectations but until we test if we can meet this deadline we wont know also placing this deadline will push us as a team to focus and improved speed of work. I personally think a week is a good target dependent on the skill and difficulty of the buildings but 2 weeks should be the limit if we are to push on.
The art team we all sat down including myself and Phil as we are overall team leaders to have final decisions on work. We discussed the art team and their collaboration with the engine team, there priority is to upskill in texturing and uv mapping to work with the 3d buildings handed over. Then to produce basic, slightly visual and then some high quality (public viewed) concepts. The engine team just need the basic concepts where its simple boxes labelled car or building etc with some annotations of angles and maybe movement mechanics. This will assist them with the engine block out and add to our design work rather than first decision of put that there it will do. James is inevitably leader of the art team and will have to pass on some skills to his co workers to produce quality for this process. Im sure more has been added to this plan of action i believe the production of atlas mapping has been worked on over the day.
Then the engine team currently has HUD to work on, additional blueprints that could be implemented for interactivity (e.g. ladder climb) and then the rest is working on the block out with relies on the 3d and art team to collaborate with them. I think we have formulated a effective team workflow with a good balance to it for everyone to have equal input. Hopefully this goes as well as we plan it to as this goes towards credit for our professionalism and industry practice marks.
For today we borrowed Phil and David from the engine team as currently they have little to do and 3D is a priority so loaning them to 3D was a way of showing we are all team players if needs we interchangable team positions to accelerate the process will occur.
As 3D team leader i tasked my group to Trinity House Lane, myself and rinalds picked 3 buildings and Phil and David picked 1. Leaving a few for Viktor and Brad when they return, the lists are up on Basecamp and they are yet to claim buildings and i havent seen them so hopefully they are in tuesday to catch up. Currently i am working on weatherspoons up to Bob carvers they are my 3 buildings all connected so should be no issues.
Throughout the day teams sat with their teams worked together and it just felt like we had missed a trick not doing this from the start, lots of peer to peer learning and group/team critique will come from this our communication has definately improved and has been underlined as key for this to succeed. On a final note we have decided to implement the Oculus Rift into our project which will hopefully attract alot of attention when we finally display to the public.
Recently we all had our hand ins at the beginning of January, this was a mock deadline for us set to give us a halfway tutorial point from our tutors to give feedback on our work so far. Last blog of mine for client was some final tweaks to my hand in like improved textures. I managed to hand in on time and made sure that the engine was functional with Phil for all the learning objectives in the interactive environments module as well as peoples work handed to us to go in engine.
Moving on from that during the assessment period myself and Phil as team leaders discussed how we can try a new way of keeping everyone engaged in the project with faster work rate, this was because towards the end of the semester people was saying they didn’t enjoy doing for example 3D or a specific area of 3D like buildings. This gave an idea of a industry style pipeline to be implemented, this means that the group would be given a chance to partition into groups (maybe people they don’t normally work with) to work in smaller mini teams showing collaboration in their given specific areas. For example one person may think after this course they want to be a concept artist, so we would allocate that person to the art team. This would mean they focus mainly on the art side of work so concepts, public visuals (logos etc.) and texturing. Despite this it would not give them total immunity to 3D and other work as it is needed from everyone just they will have less of it than the 3D team.
Now this may not work and may take some adapting for people to get their own design process to adapt to the pipeline but if we can pull it off it shows we can work collaboratively as a team using industry practice which would surely add to our marks for professionalism. There may be areas that work and area that don’t so we can hopefully tailor the process to maximise our workflow. I’m thinking the pipeline as in handing your model to someone else to texture to get it back as its not fully optimised may cause some issues but im hoping the mini teams will definitely work, to start getting people to work with other people that like the same area of work and they will hopefully teach each other techniques for speed.
All that being said I called a group meeting to discuss this semester and last semester, how we did and how we are going to move forward. This was sort of a reiteration of Gareth and Paul’s meeting about us being way behind schedule and alot not being up to scratch. Nothing was targeted at any individual just a general grilling for everyone trying to hammer in that we need to pull together to finish this project. Mainly we need more work but we need speed with that, peoples speed of work is what could cost us so whether some extra tutorials or peer help would benefit the group wide up-skilling. To try implement that we are going to set deadlines, so a deadline will be set per piece and if the person does not meet the deadline then the work shall be taken off them for someone else to do, then its only yourself you are letting down the work is getting done just less and less by the people who don’t put in the time.
A few things was highlighted about re addressing our hand in work like texturing, texture quality, and optimising models. This was obvious from the hand in it needed to be higher quality but i just pointed out again.
I then moved onto the Hellblade development diary that i found, i did a blog post on this and put it on basecamp for the group to see. Unfortunately a few missed this notification so i did a little session where we watched the video as a group and then i took us through the features of collaboration, team work, design process, and adapting to your working environment. All of these we are going to try implement into our work as described above with the pipeline. The other thing was to do a development diary of our own, currently we have 2 development videos but we believe the style of the video Hellblade did was much more descriptive and professional that the process we have been taking.
We have now decided to implement the Oculus Rift into our project which when implemented into the project should attract as much attention as the last years Paragon project which had alot of views assisted by trying the rift. This is an exciting feature for us as virtual reality headsets seem to be edging into next generation gaming especially with Sony Ps4’s upcoming Project Morpheus.
This concluded this weeks client project meeting, we left giving everyone a week to figure out what they want to do in this project. But it was cleared up that they should not focus so much on what for the client project but a deeper thought into what they want to do after the course.
Then the remainder of the buildings was put into “to-do’s” on basecamp for people to claim and complete, this is just for grabs until next week when the 3D team will take priority over buildings.
It came around alot faster than expected but we have now handed in for the client project. Despite a recently blog on my christmas and session 13 work we was given a slight extension to our initial Tuesday hand in to the Friday due to some engine issues that with slight extra time would be implemented, also a lack of textures from most people was still to come in so we was grateful for the extra time. Despite that by now we should be tuned to deadlines having them done before the actual day so any fine tweaks can be made with little panic.
With this slight extension it gave me some room to do some more work. I could have gone many ways to add to my work like texturing my car but I realised this process may need slightly longer and not to be rushed. So instead I re-addressed my textures from the whole process going back to my first buildings to improve the general look.
When I went back to look at some of my early unwraps and textures it shocked me how far i have come in advancing my unwrapping and texturing skills. With some quick tweaks to early unwraps without redoing it all i made some more room for larger uv’s which means higher quality. One thing in particular lacking from some early buildings was that of doors and windows, early on we mentioned the idea of multi subbing windows to give a realistic reflection and look to the buildings but to do this we needed an interior otherwise you just see emptiness behind your building. I decided for now to apply some simple window textures which isnt as realistic but at least its not seethrough glass or a grey untextured area. Then for the doors most of my buildings are shops and with our setting being night time i just applied some shutters so imply its closed and locked up.
Here are my hand in buildings:
Crawshaws
Cheque centre
M&S
Parliament street building
Quick Silver
Poundland
I was pleased with the outcomes of m&s, poundland and parliament street building probably because they are my later buildings to be textured i had a bit more knowledge to improve my work. With the other 3 being basic buildings not much could be done but correct stiching unwrapping has been done so cannot complain much just needs a bit of work. There was a minor issue with the windows on crawshaws they look very washed out and white also the bottom windows have some random shapes on them, im yet to figure out why this is its probably a quick fix once i figure it out though.
Overall very pleased with my extra work done in the additional time and feel i am improving on the texturing with each piece of work i do. Next is to tackle unwrapping and texturing the cars for the level, this may take alot of time but it will get there and make me a better worker for it.
At the end of the previous session we discussed what we would be doing over the christmas period running up to hand in. Using Basecamp we set priorities in the form of to-dos some specified to individuals for example myself i had to blueprint pawn possession, or general to-dos for everybody like finish all building textures. This was made very clear before the holiday and the use of basecamp and communication was mentioned prior to that aswell as vital over the holiday period. This was evident due to basecamps tracking of log ins half the group didnt use the program at all and few used it regulary, this picked up when reminded but it should be a habit by now to be keeping well involved with all the work making sure your not missing one bit. That being said we reiterated it on return hoping for a collective group to be working professionally using the likes of basecamp on a regular basis.
Over the holiday period most had to admit little had been done or more could have been done, I myself know i did do work but could have done more if I had only special occasions off. Despite that I have managed to texture 5 of my 6 buildings after finishing the parliament street building model with the last texture in progress , my blogs are current in the client. Since return I have modelled an interior for the classic mini, blueprinted Pawn possession (with assisstance from Phil for the exiting of the vehicle which took a while and 2 heads to figure out), and most recently to much joy I have managed to correctly rig, weight paint, animate and blueprint my mini to be driveable in engine. I will now elaborate on my process for each of these with images.
As far as textures go most i have already uploaded so ill just show the most recent, which is a model im also yet to show.
This slideshow requires JavaScript.
This is a building down parliament street, I chose it as I know modelling is one of my strong points so I felt a more difficult looking building would be better tasked to myself. I had some issues along the way despite that the making of the bottom half was the hardest part with the extruded sandy parts needing different sizes each time and to bend around the window. I am very pleased with my final product of the model and doing such a detailed building in 2781 polys when a high detail building was originally tasked at 20000, shows im getting better at modularity and having an eye for optimising my model.
The texture i was very pleased with, I used simple planar mapping for most of the unwrap then just a few cases of needing to grab verticies to not have stretches around stiched corners and then just scaling so that the checker pattern created nice neat squares across each area. The changes i will make to this will be the bottom section, the stone part was a basic tileable stone texture that I have hand painted it to make it look like bricks, but after some digging a stone texture like that of the original building was found so its just needs applying. There is a slight issue with the bricks on the left window they skew a bit I wasnt sure on why this was at the time so i continued with the unwrap and when I textured it I forgot about that being left. This needs patching up once I find out why its done this but shouldnt be too much hassle hopefully. Next is to apply normal maps to my buildings to create more realistic textures.
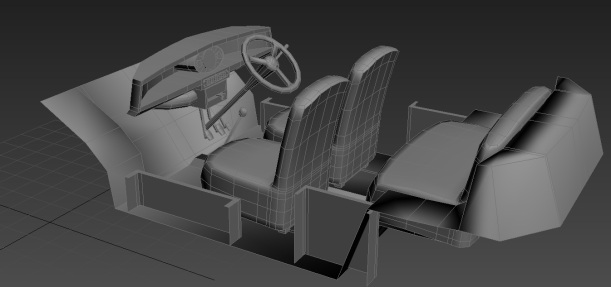
Moving on I modelled an interior for my classic mini using my own reference and just reference from classic mini online stores for accuracy.
With this interior modelled we can now have the in car view for the classic mini not only for people walking past to see a interior but for the pawn possession feature we can drive this in first person view. Im really happy with my end result for the interior all that is left for the car now is to be textured. Im not sure ill have time for this before hand in but certainly will be a definate for the end product.
Now to have all this used to its max I was tasked with the pawn possession feature for interactivity which would be done in blueprints. This is a slight alteration of my initial idea early on of a racing game due to the figure of 8 on the map but i wanted to be involved especially when they are my vehicles in the project. Being fairly efficient in blueprints this was a task i felt confident in completing using the help of online tutorials and ue4 answer hub. Now this was the case i had it all working then realised that we need to get out once we are in. This was proving more difficult as the player would spawn back at player start instead of outside the car. Also spawing the player inside the car in view for 3rd person example purposes made 2 collisions collide and send everything absolutely mental.
With the addition help from Phil it took us most of the day but we finally figured out how to get them in and out of the car. After celebrating we then realised we can get out and in at anytime from anywhere. Simple fix of a radius overlap on collision enabling the key press to enter, then the exit the player could just bail tuck and roll at anytime like GTA. We didnt want this so again took time to work out how to calculate it to only be exitable when throttle is less than 1. This was completed by the end of the day and we now have a working pawn possession in our project to add to interactivity.
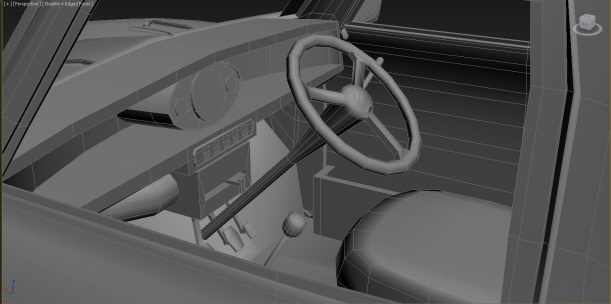
But to make this our own personal touch rather than Unreal Engine 4’s preset sedan vehicle in our game which didnt match the 60s theme at all, I was then challenged with the unknown area of rigging a vehicle for it to then work in Ue4 with our pawn possession. Im going to be straight I did this process over and over so many times due to issues with bones, not weight painting it right, UE4 claiming un-weighted bones, wrong hierachy for the bones. And that was just 3DSMax issues, when i got all the max issues resolved I put it in UE4 for animation blueprints not to fire, car controls not to work, the car to have everything set up and stay stationary, physics assets not correctly set up, the sedan to be clashing with the custom vehicle blueprints and setting up the front and back wheel blueprints wrong having all wheels rotating manicly. It was a laugh but i can now say ive done it that many times through trail and error the process has been memorised and hopefully mastered for future use. It was such a relief to see car wheels spinning after hours of stress and frustration on why it all was going wrong for me. Persistance got me there and now im proud to have the vehicle able to be possessed and driveable. Additional animation will need to be taken into consideration due to the interior view like the steering wheel with hands, gear changes, dials etc but for now it works to a standard im pleased with for a rookie in the rigging area.
Here are some screenshots of the process in 3dsMax:
This slideshow requires JavaScript.
Then moving into UE4:
This slideshow requires JavaScript.
Despite this lengthy process it was well worth me sticking to it, not only for end product for the client but this will also help me in my self initiated racing game.
On reflection im pleased with the work that I have done but would have liked more done over the holidays to have a larger amount of especially assets to hand in. Due to the complexity of cars its not a botch quick job it takes time and with focusing on them in client and self initiated i think i need a break to rapidly produce smaller assets for the project.
As for the hand in, Myself and Phil will be making the modular road system again due to some slight measurement miscalculations and then texturing that ready for hand in. Hopefully we will have a collective textured section of our project which is the primary target. We already covered the interactivity side with a treasure hunt, involving pick ups, inventory system, gate and key system, driveable car (pawn possession), throwable object projectiles, and then a basic HUD with minimap and inventory system. My contribution to this was the pawn possession due to my main skillsets being in modelling and Phil taking the lead on the blueprints side of things.
Hopefully everybody does manage to get everything tasked on basecamp done within prioritising so buildings modelled and textured the priority then all the rest being added bonus. I look forward to our feedback as i know we should be alot further ahead and hopefully the group steps up to really get the best out of our client piece for the final product.
EDIT: I have now resolve the brick skewing issue it was a mistake on my behalf aligning some verticies horizontally that shouldnt have been, really simple fix thankfully.